RCE Endeavors 😅

May 25, 2023

Function Hooking: Export Address Table Hooks (7/7)

Filed under: Programming,Reverse Engineering — admin @ 11:44 PM

Table of Contents:

The export address table (EAT) is also another interesting candidate for installing function hooks. Similar to the import address table, the export address table contains tables with information about functions that a dynamic link library exports to callers. Specifically, there are three tables of interest: the export name table, export ordinal table, and export address table. When using the GetProcAddress function, these tables are traversed to find the appropriate address of the desired function. Hooking a function involves overwriting an entry in the export address table with the offset to your hook function. After doing this, calls to GetProcAddress will return your hook function instead of the original.

Getting the export directory

To begin getting access to the export address table, you must first get a pointer to the export directory.

IMAGE_EXPORT_DIRECTORY* GetExportDirectory(void* const moduleBaseAddress) {

    ULONG size{};
    auto* exportDirectoryAddress{ ImageDirectoryEntryToData(
        moduleBaseAddress, TRUE, IMAGE_DIRECTORY_ENTRY_EXPORT, &size) };

    return reinterpret_cast<IMAGE_EXPORT_DIRECTORY*>(
        exportDirectoryAddress);
}

Getting the export directory.

Getting the export directory is straightforward: the ImageDirectoryEntryToData function can be used, passing in IMAGE_DIRECTORY_ENTRY_EXPORT as the desired directory entry.

Traversing the export tables

After obtaining the directory entry, the three tables will be present. These three tables can be indexed into in parallel while searching for a target function to hook.

DWORD* GetEATEntryByName(void* const moduleBaseAddress,
    const std::string& targetFunctionName) {

    auto* exportDirectory {
        GetExportDirectory(moduleBaseAddress) };
    if (exportDirectory == nullptr) {
        std::cerr << "Could not get base address of imports directory"
            << std::endl;
        return nullptr;
    }

    auto* addressOffsets{ RvaToPointer<DWORD>(moduleBaseAddress,
        exportDirectory->AddressOfFunctions) };
    const auto* nameOffsets{ RvaToPointer<DWORD>(moduleBaseAddress,
        exportDirectory->AddressOfNames) };
    const auto* ordinalOffsets{ RvaToPointer<WORD>(moduleBaseAddress,
        exportDirectory->AddressOfNameOrdinals) };

    for (size_t index{}; index < exportDirectory->NumberOfFunctions; index++) {

        const auto exportedFunctionName{ std::string {
            RvaToPointer<char>(moduleBaseAddress,  nameOffsets[index]) } };

        if (targetFunctionName == exportedFunctionName) {
            return &addressOffsets[ordinalOffsets[index]];
        }
    }

    return nullptr;
}

Traversing the export directory tables to look for a desired function.

The code above references three tables in the export directory: addressOffsets, which holds the base of the export address table, nameOffsets, which holds the base of the export name table, and ordinalOffsets, which holds the base of the export ordinal table. The code then loops through each exported function and checks to see if the function name matches the target function name to hook. If so, then the export table entry of the function is returned to the caller. If no export matches the target function name, then a nullptr is returned.

Installing the hook

Hooking the export address table is a little more complicated than the import address table. The import address table held absolute addresses that were resolved at runtime, so they could be overwritten directly with the address of the hook function. The export address table, however, contains relative virtual addresses to the module load address. This presents a complication: the relative virtual offset has a DWORD type, but in a 64-bit process, you have a much larger address range. It is possible for your hook function to be greater than 4 GB away from the module load address, meaning that the relative address would not fit in the DWORD type. To overcome this, you can allocate memory near the module and write in an absolute jump to your hook function. The AllocateClosestAfterAddress function shown below allocates memory close to the provided module.

void* AllocateClosestAfterAddress(void* const moduleAddress, const size_t size) {

    MODULEINFO moduleInfo{};
    auto result{ GetModuleInformation(GetCurrentProcess(), 
        static_cast<HMODULE>(moduleAddress), &moduleInfo, sizeof(MODULEINFO)) };
    if (!result) {
        PrintErrorAndExit("GetModuleInformation");
    }

    auto allocAddress{ reinterpret_cast<DWORD_PTR>(
        moduleInfo.lpBaseOfDll) + moduleInfo.SizeOfImage };

    void* allocatedAddress{};
    constexpr size_t ALLOC_ALIGNMENT = 0x10000;
    do {
        allocatedAddress = VirtualAlloc(reinterpret_cast<void*>(allocAddress),
            size, MEM_RESERVE | MEM_COMMIT, PAGE_EXECUTE_READWRITE);
        allocAddress += ALLOC_ALIGNMENT;
    } while (allocatedAddress == nullptr);

    return allocatedAddress;
}

The AllocateClosestAfterAddress will allocate memory close to a target module.

The AllocateClosestAfterAddress function uses the GetModuleInformation function to get the memory bounds of the provided module. After the bounds are found, the function tries to allocate memory immediately past the end of the module’s address range. Once an address is able to be allocated, it is returned to the caller.

With this problem resolved, you can now begin the process to overwrite the export address table entry. The InstallEATHook below function performs the full hooking logic.

template <typename OriginalFunctionPtr>
void InstallEATHook(const std::string& targetModuleName,
    const std::string& targetFunctionName, void* const hookAddress,
    OriginalFunctionPtr& originalFunction) {

    auto* moduleBaseAddress{ GetModuleHandleA(targetModuleName.c_str()) };
    if (moduleBaseAddress == nullptr) {
        moduleBaseAddress = LoadLibraryA(targetModuleName.c_str());
    }

    auto* const eatEntryRva{ GetEATEntryByName(moduleBaseAddress, targetFunctionName) };
    if (eatEntryRva == nullptr) {
        std::cerr << std::format("Export address table entry "
            "for {}:{} not found", targetModuleName, targetFunctionName)
            << std::endl;
        return;
    }

    originalFunction = reinterpret_cast<OriginalFunctionPtr>(
        RvaToPointer<void>(moduleBaseAddress, *eatEntryRva));

    const auto jumpBytes{ CreateJumpBytes(hookAddress) };
    auto* const jumpStub{ AllocateClosestAfterAddress(
        moduleBaseAddress, jumpBytes.size()) };
    if (jumpStub == nullptr) {
        PrintErrorAndExit("VirtualAlloc");
    }

    std::memcpy(jumpStub, jumpBytes.data(), jumpBytes.size());

    const auto oldProtections{ ChangeMemoryPermissions(
        eatEntryRva, sizeof(void*), PAGE_EXECUTE_READWRITE) };
    *eatEntryRva = static_cast<DWORD>(PointerToRva(jumpStub, moduleBaseAddress));
    ChangeMemoryPermissions(eatEntryRva, sizeof(void*), oldProtections);
}

Overwriting an export address table entry with an offset to the hook function.

The InstallEATHook function begins by finding the export address table entry. If an entry is found, then the address of the original function is saved and a block of memory is allocated close to the target module. The jump stub is written in to this allocated block of memory. Lastly, the export address table entry’s relative virtual address is then written in with the relative virtual address of the jump stub address. At this point, the hook is installed and ready to be tested out.

As before, the hook function will change a parameter and forward the call to the original function

using MessageBoxAPtr = int(__stdcall*)(HWND, LPCSTR, LPCSTR, UINT);
static MessageBoxAPtr OriginalMessageBoxA{};

int HookMessageBoxA(HWND hWnd, LPCSTR lpText, LPCSTR lpCaption, UINT uType) {

    return OriginalMessageBoxA(hWnd, "Hooked Hello World!", lpCaption, uType);
}

The hook function that will be called instead of MessageBoxA.

Verifying the hook

With the hook function defined, the export address table hook can be tested out.

int main(int argc, char* argv[]) {

    MessageBoxAPtr UnusedMessageBoxAOriginalFncPtr =
        reinterpret_cast<MessageBoxAPtr>(
            GetProcAddress(GetModuleHandleA("user32.dll"),
                "MessageBoxA"));

    InstallEATHook("user32.dll", "MessageBoxA",
        HookMessageBoxA, OriginalMessageBoxA);

    MessageBoxAPtr MessageBoxAFnc =
        reinterpret_cast<MessageBoxAPtr>(
            GetProcAddress(GetModuleHandleA("user32.dll"),
                "MessageBoxA"));

    if (MessageBoxAFnc == nullptr) {
        std::cerr << "Could not find MessageBoxA export"
            << std::endl;
        return -1;
    }

    MessageBoxAFnc(nullptr, "Hello World!", nullptr, 0);

    return 0;
}

The program that installs an export address hook on the MessageBoxA function.

This program will begin by installing the export address table hook. After installing the hook, the call to GetProcAddress will resolve a pointer to the MessageBoxA function. However, since the address was overwritten, the pointer that will be returned will be to HookMessageBoxA. Now, when the caller uses the MessageBoxAFnc pointer, they will instead be calling HookMessageBoxA, which will change “Hello World!” to “Hooked Hello World!” and call the original MessageBoxA function.
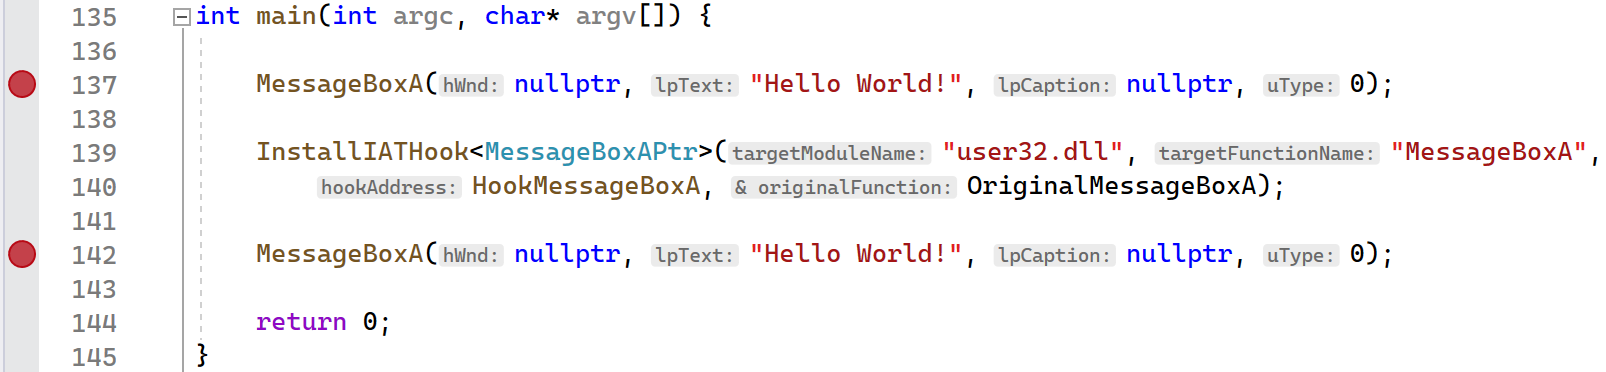
Running the demo

The ExportAddressTableHook project provides the full implementation that was presented in this section. To see the export address table hook, set breakpoints on the lines following the assignment of the MessageBoxAPtr function pointers as shown below.

Breakpoints set after assignment of the function pointers.

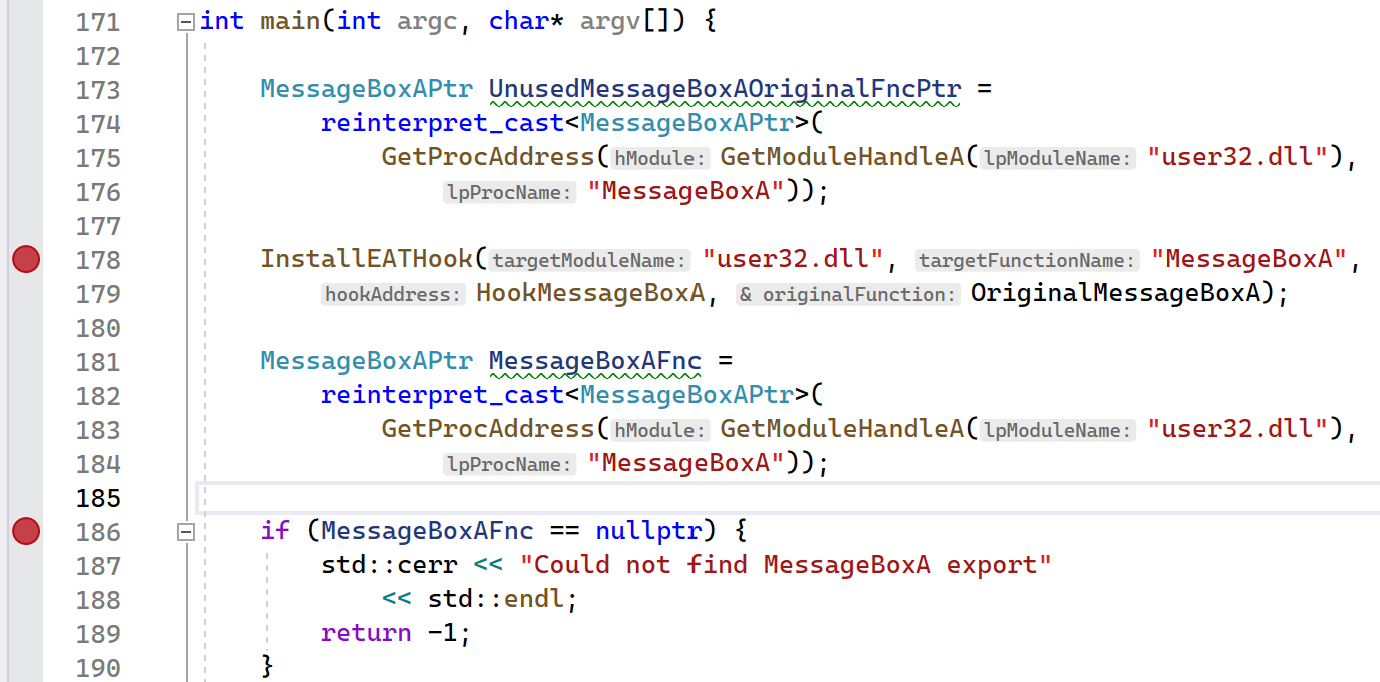
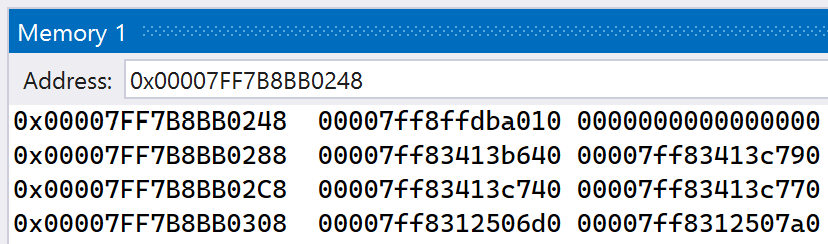
Launch the application and take note of the address stored in UnusedMessageBoxAOriginalFncPtr. Before the hook was installed, GetProcAddress resolved the address to MessageBoxA, as expected. You can verify this on your own by hovering your cursor over the UnusedMessageBoxAOriginalFncPtr variable and seeing the address and function that it points to.

The UnusedMessageBoxAOriginalFncPtr function pointer correctly resolves to MessageBoxA.

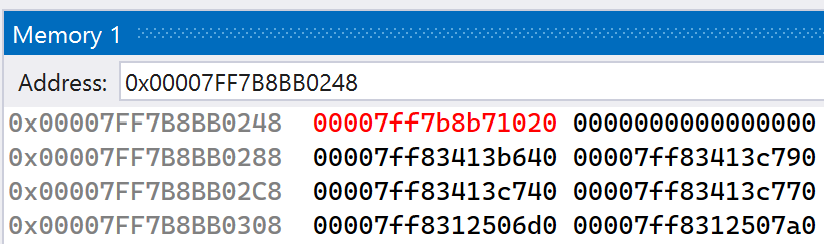
Continue execution and let the second breakpoint get hit. At this point, the export address table hook has been installed. Hover your mouse over the MessageBoxAFnc function pointer and notice that it has a different address.

The MessageBoxAFnc function pointer has a different address.

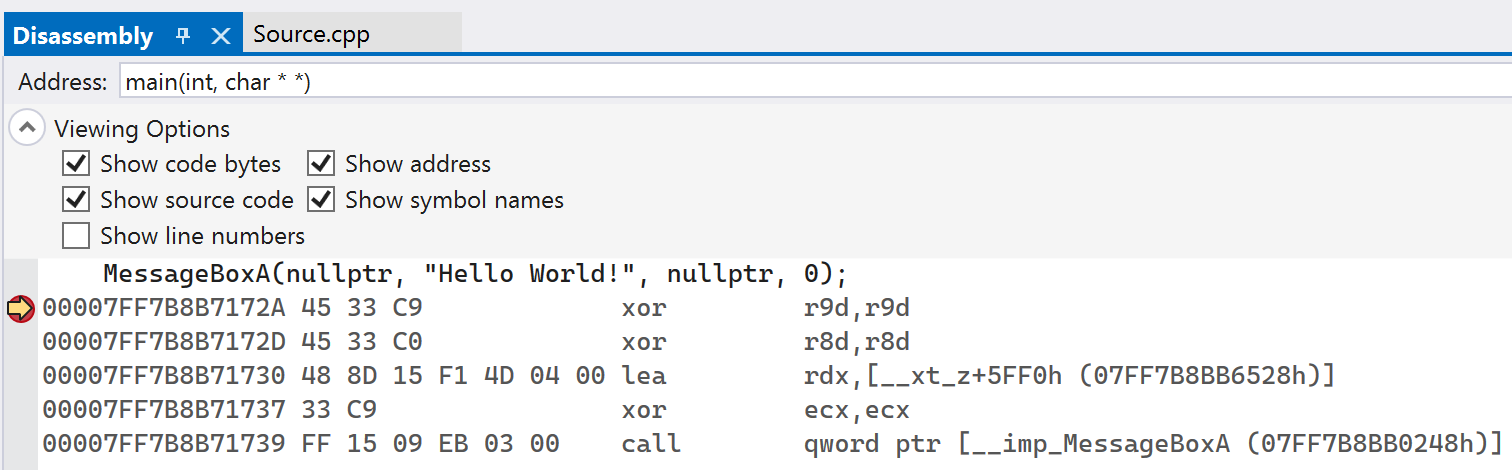
This time, GetProcAddress returned a different address for the MessageBoxA function. This is because GetProcAddress iterated over the exports again, but the export address for MessageBoxA was overwritten by the InstallEATHook function. If you look at this address in the Disassembly window, you will see that it points to the stub that jumps to the HookMessageBoxA function.

The generated stub that jumps to HookMessageBoxA.

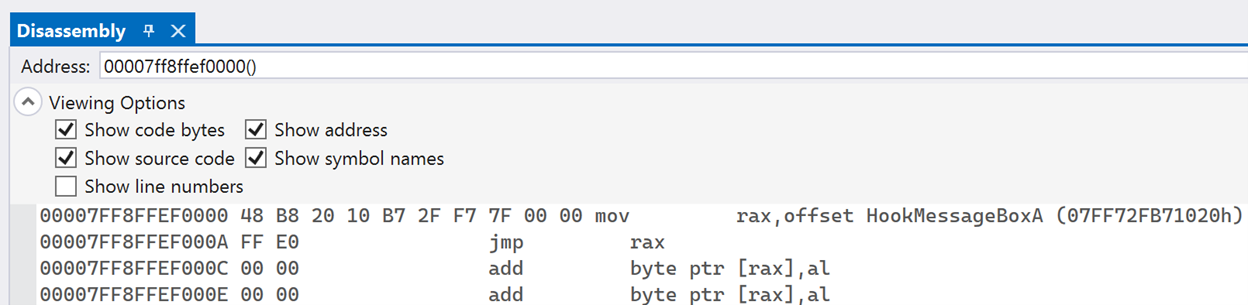
This shows that the export address table hook was successful. After the hook is installed, all calls to GetProcAddress for MessageBoxA will result in the HookMessageBoxA function being called instead.

Function Hooking: Import Address Table Hooks (6/7)

Filed under: Programming,Reverse Engineering — admin @ 11:44 PM

Table of Contents:

The import address table (IAT) is a table that holds pointers to functions imported from other dynamic link libraries (DLLs). When the Windows loader is loading an executable (image), this table will be filled with absolute addresses to imported functions that the image will use. This address table provides another good opportunity to place function hooks; to do so is simply a matter of overwriting the function pointer at the desired location in the import address table.

Getting the imports directory

To get the import address table, you first need to get the base of the imports directory. This imports directory will be an array of structures, with the structure containing import information on each module that is being imported. The imports directory can be obtained with a call to ImageDirectoryEntryToData, passing the IMAGE_DIRECTORY_ENTRY_IMPORT value as the directory entry parameter. The code below shows how to obtain the imports directory.

IMAGE_IMPORT_DESCRIPTOR* GetImportsDirectory(void* const moduleBaseAddress) {
    
    ULONG size{};
    auto* importsDirectoryBaseAddress{ ImageDirectoryEntryToData(
        moduleBaseAddress, TRUE, IMAGE_DIRECTORY_ENTRY_IMPORT, &size) };

    return reinterpret_cast<IMAGE_IMPORT_DESCRIPTOR*>(
        importsDirectoryBaseAddress);
}

Code to obtain the base address of the import address table.

Traversing the import tables

After obtaining the base of the imports directory, each import can be traversed. Each import entry contains information about the module name, and offsets into the import name table and import address table. Finding the desired function to hook is just a matter of traversing the imports directory, finding the target module, then traversing the target module’s import name and address tables for the name of the function to hook. The code below shows how to traverse the various import tables.

IMAGE_THUNK_DATA* GetIATEntryByName(void* const moduleBaseAddress,
    const std::string& targetModuleName,
    const std::string& targetFunctionName) {

    auto* importsDirectory{
        GetImportsDirectory(moduleBaseAddress) };
    if (importsDirectory == nullptr) {
        std::cerr << "Could not get base address of imports directory"
            << std::endl;
        return nullptr;
    }

    for (size_t index{}; importsDirectory[index].Characteristics != 0; index++) {

        auto moduleName{ std::string {
            RvaToPointer<char>(moduleBaseAddress,
            importsDirectory[index].Name) } };

        std::transform(moduleName.begin(), moduleName.end(), moduleName.begin(),
            [](unsigned char letter) { return std::tolower(letter); });

        // Skip modules that are not the target module
        if (moduleName != targetModuleName)
            continue;

        auto* addressTableEntry{ RvaToPointer<IMAGE_THUNK_DATA>(
            moduleBaseAddress, importsDirectory[index].FirstThunk) };
        auto* nameTableEntry{ RvaToPointer<IMAGE_THUNK_DATA>(
            moduleBaseAddress, importsDirectory[index].OriginalFirstThunk) };

        for (; nameTableEntry->u1.Function != 0;
            nameTableEntry++, addressTableEntry++) {

            // Skip functions exported by ordinal
            if (nameTableEntry->u1.Ordinal & IMAGE_ORDINAL_FLAG) {
                continue;
            }

            auto* importedFunction{ RvaToPointer<IMAGE_IMPORT_BY_NAME>(
                moduleBaseAddress, nameTableEntry->u1.AddressOfData) };

            auto importedFunctionName{ std::string { 
                importedFunction->Name } };
            if (importedFunctionName == targetFunctionName) {
                return addressTableEntry;
            }
        }
    }

    return nullptr;
}

Traversing the import directory to find a target module and target function.

The GetIATEntryByName function implements the steps to get an import address table entry for a provided import. This function begins by obtaining a pointer to the start of the import directory. Once the import directory is found, the function iterates over all valid import directory entries. If the Name field of the current IMAGE_IMPORT_DESCRIPTOR entry matches the module that is being targeted, then the import address and import name tables are iterated over in parallel. When iterating over the import name table, the function checks to see if the imported function name matches the target function name; if so then the function returns the corresponding IMAGE_THUNK_DATA pointer that will point to the entry in the import address table. If no entries are found then the function returns a nullptr.

Installing the hook

Having obtained the import address table entry, you can now begin the process of installing the hook. The function that will be hooked in this example is the MessageBoxA function from user32.dll. The hook definition for the function is shown below:

using MessageBoxAPtr = int(__stdcall*)(HWND, LPCSTR, LPCSTR, UINT);
static MessageBoxAPtr OriginalMessageBoxA{};

int HookMessageBoxA(HWND hWnd, LPCSTR lpText, LPCSTR lpCaption, UINT uType) {
    return OriginalMessageBoxA(hWnd, "Hooked Hello World!", lpCaption, uType);
}

The hook function that will be called instead of MessageBoxA.

As before, this hook function will change a parameter and invoke the original function. Having defined the hook function, all that remains is to install the hook and overwrite the import address table to point to it.

template <typename OriginalFunctionPtr>
void InstallIATHook(const std::string& targetModuleName,
    const std::string& targetFunctionName, void* const hookAddress,
    OriginalFunctionPtr& originalFunction) {

    auto* moduleBaseAddress{ GetModuleHandle(nullptr) };
    auto* iatEntry{ GetIATEntryByName(moduleBaseAddress,
        targetModuleName, targetFunctionName) };
    if (iatEntry == nullptr) {
        std::cerr << std::format("Import address table entry "
            "for {}:{} not found", targetModuleName, targetFunctionName)
            << std::endl;
        return;
    }

    originalFunction = reinterpret_cast<OriginalFunctionPtr>(
        iatEntry->u1.Function);

    auto oldProtections{ ChangeMemoryPermissions(iatEntry,
        sizeof(IMAGE_THUNK_DATA), PAGE_EXECUTE_READWRITE) };
    iatEntry->u1.Function = reinterpret_cast<ULONGLONG>(hookAddress);
    ChangeMemoryPermissions(iatEntry, sizeof(IMAGE_THUNK_DATA), oldProtections);
}

int main(int argc, char* argv[]) {

    MessageBoxA(nullptr, "Hello World!", nullptr, 0);

    InstallIATHook<MessageBoxAPtr>("user32.dll", "MessageBoxA",
        HookMessageBoxA, OriginalMessageBoxA);

    MessageBoxA(nullptr, "Hello World!", nullptr, 0);

    return 0;
}

The InstallIATHook function overwrites an import address table entry for a specified module and function.

Overwriting an import address table entry is as simple as it sounds; simply write the address to your function in place of the one that is there. This is what the code above is doing: the import address table entry for the target function is retrieved, the old address is saved in originalFunction, and the address to the hook function is written in its place. After installing the hook and invoking MessageBoxA, the HookMessageBoxA function will be invoked, at which point it will change the third parameter to “Hooked Hello World!” and forward the call to the original MessageBoxA function.

Running the demo

The ImportAddressTableHook project provides the full implementation that was presented in this section. The best way to see the import address table hook in action is to watch the entry be overwritten. Begin by setting a breakpoint on the two MessageBoxA call and launching the application.

Setting breakpoints on the MessageBoxA calls.

When the first breakpoint gets hit, switch to the Disassembly window in Visual Studio. Note the address that will be called that corresponds to __imp_MessageBoxA. In the screenshot below it is 0x07FF7B8BB0248, though it will be different on your machine.

The instructions for the MessageBoxA call.

Take this address and put it into Visual Studio’s Memory window. View the memory content as 8-byte integers by right-clicking the address in the window and selecting 8-byte integer. After doing so, your window should look similar to below, though with different addresses present.

The import address entry displayed in the Memory window.

The value at address 0x07FF7B8BB0248 is shown to be 0x00007FF8FFDBA010, which corresponds to the address of the MessageBoxA function. Continue execution of the application. After dismissing the message box that pops up, the second breakpoint will get hit. In the Memory window, you should see that the address at 0x07FF7B8BB0248 has been overwritten, as shown below.

The import address table entry being overwritten.

If you follow the new address in the Disassembly window, you should see that it corresponds to the HookMessageBoxA function. After continuing execution, a new message box will pop up, this time with a different message. This shows that the import address table entry overwrite was successful and that the MessageBoxA function has been hooked.

Function Hooking: Virtual Table Hooks (5/7)

Filed under: Programming,Reverse Engineering — admin @ 11:44 PM

Table of Contents:

A special case of function hooking is virtual table hooking. This technique involves overwriting an address in the virtual table of an instance of a C++ class. Recall that when you have a class hierarchy, deriving classes can overwrite virtual functions of the base class with a different implementation. For example, take the two simple classes shown below:

class BaseClass {
public:
    virtual ~BaseClass() = default;

    virtual void Hello() const {
        std::cout << "Hello" << std::endl;
    }

    virtual void Name() const {
        std::cout << "Base" << std::endl;
    }

    virtual void Order() const {
        std::cout << "0" << std::endl;
    }
};

class DerivedClass : public BaseClass {
public:
    void Name() const override {
        std::cout << "Derived" << std::endl;
    }

    void Order() const override {
        std::cout << "1" << std::endl;
    }
};

Base class and derived class implementations. The derived class overwrites two virtual functions of the base class.

DerivedClass inherits from BaseClass and overwrites two virtual functions: Name and Order. If you instantiate DerivedClass through a BaseClass pointer, it will know to call the appropriate Name method.

int main(int argc, char* argv[]) {
    
    BaseClass* base{ new BaseClass{} };
    BaseClass* derived{ new DerivedClass{} };

    // Prints out "Base"
    base->Name();

    // Prints out "Derived"
    derived->Name();

    std::cout << std::format("Base type equals derived type? {}",
        (typeid(base) == typeid(derived))) << std::endl;


    return 0;
}

The base and derived instances both have the same type, but call different Name functions.

This dynamic dispatch functionality, where a class is able to know the appropriate function to call, is implemented by the compiler with virtual tables, which you can think of as an array of function pointers whose entries point to the appropriate method implementations for the class. The easiest way to see this in action is to look at the assembly listings for when the base->Name() and derived->Name() lines are executed to see what the difference is. The assembly instructions for each call are shown in the tables below:

Instruction BytesInstruction
48 8B 45 08mov rax, qword ptr [rbp+0x8]
48 8B 00mov rax, qword ptr [rax]
48 8B 4D 08mov rcx, qword ptr [rbp+0x8]
FF 50 10call qword ptr [rax+0x10]
The assembly instructions for the base->Name() function call.
Instruction BytesInstruction
48 8B 45 28mov rax, qword ptr [rbp+0x28]
48 8B 00mov rax, qword ptr [rax]
48 8B 4D 28mov rcx, qword ptr [rbp+0x28]
FF 50 10call qword ptr [rax+0x10]
The assembly instructions for the derived->Name() function call.

The instructions for both calls look pretty similar. In fact, the only difference is that the base instance loads destination register values from [RBP+0x8] while the derived instance loads from [RBP+0x28]. This is nothing surprising; these are two different declared variables so they will have different locations in the stack frame. The interesting part is what is happening with the RAX register. This register is initially loaded with the memory address of the class instance, then it is set again with the address of the first member of the class. The address at [RAX+0x10] is then invoked to perform the call to the Name function.

Walking the virtual table

You may notice that this function takes in an argument; the argument is passed in the RCX register per the x64 calling convention. The RCX register is loaded with [RBP+0x28], which is the address of the class instance. What this actually represents is the this pointer being passed to the member function. This is a convention that you will see with every invocation of a C++ member function.

This means that the first member of these two classes has a different value, and that calling it at +0x10 will take you to a different location in the program’s execution. Looking at the class definitions, there were no members defined for either class. This hidden member is the classes virtual table, which, as mentioned earlier, is an array of function pointers that hold the address of the appropriate function to call for the class. In this array, there will be an entry for every virtual function that the class type declares. The code below shows additional changes being added to iterate over the virtual address table.

int main(int argc, char* argv[]) {
    
    BaseClass* base{ new BaseClass{} };
    BaseClass* derived{ new DerivedClass{} };

    // Prints out "Base"
    base->Name();

    // Prints out "Derived"
    derived->Name();

    std::cout << std::format("Base type equals derived type? {}",
        (typeid(base) == typeid(derived))) << std::endl;

    auto** vtableDerivedBaseAddress{ reinterpret_cast<void**>(
        *reinterpret_cast<void**>(derived))};

    for (int i{}; i < 4; i++) {
        void* vtableEntry{ vtableDerivedBaseAddress[i] };
        std::cout << std::format("{}: 0x{:X}",  i,
            reinterpret_cast<size_t>(vtableEntry)) << std::endl;
    }

    return 0;
}

The modified code that traverses the virtual table of the derived instance.

We use this knowledge when declaring vtableDerivedBaseAddress above. This variable holds the virtual table of the derived instance. To look at the table, you can iterate over the pointers at the appropriate indices. Since BaseClass defines four virtual functions, there will be four entries in the virtual table; you can loop over these and print out the virtual function address. When running this program, you should see output similar to below, though the exact addresses will be different.

Base
Derived
Base type equals derived type? true
0: 0x7FF6D3203A60
1: 0x7FF6D3203D40
2: 0x7FF6D3203E40
3: 0x7FF6D3203EE0

The console output when the program above is run.

Putting these four addresses into Visual Studio’s Disassembly window lets you verify that these pointers are indeed pointing to the appropriate virtual functions. The mappings between indices, addresses, and function names are shown below:

IndexAddressFunction Name
00x7FF6D3203A60DerivedClass::~DerivedClass
10x7FF6D3203D40BaseClass::Hello
20x7FF6D3203E40DerivedClass::Name
30x7FF6D3203EE0DerivedClass::Order
The full virtual table for the derived instance.

Installing the hook

Having located the virtual table, you can now hook a function by overwriting a pointer stored in this table. Note that this hook is specific to the class instance; only the virtual table for the instance is being overwritten; this method does not install a global hook that affects all callers of the method. Thus, virtual table hooking is a good technique when you have the special need of hooking a C++ class member function, but also need the granularity of the hook applying to specific instance(s) of the class. Overwriting the virtual table entry is simply a matter of setting the appropriate memory permissions and writing in the new pointer. The code below shows how to overwrite a virtual function at a specified index.

void OverwriteVTablePointer(void** const vtableBaseAddress,
    const size_t index, const void* const hookAddress) {

    auto oldProtections{ ChangeMemoryPermissions(&vtableBaseAddress[index],
        sizeof(void*), PAGE_EXECUTE_READWRITE) };
    std::memcpy(&vtableBaseAddress[index], &hookAddress, sizeof(void*));
    ChangeMemoryPermissions(&vtableBaseAddress[index],
        sizeof(void*), oldProtections);
}

The OverwriteVTablePointer writes in a new pointer at a specified index in the provided virtual table.

As an example, the Name function in the derived instance will be hooked. A function pointer to the original Name function is also declared since the hooked function will invoke it.

using NamePtr = void(__stdcall*)(void* const thisPointer);
static NamePtr OriginalName{};

void HookName(void* const thisPointer) {
    std::cout << "Hooked Name!" << std::endl;
    OriginalName(thisPointer);
}

The HookName function will be invoked instead of the derived instance’s Name function.

Now, with the hook function definition in place, the virtual table address can be overwritten. This is done by adding the following code to the end of the main function.

std::cout << "Performing function hook on derived instance"
    << std::endl;

OriginalName = reinterpret_cast<NamePtr>(vtableDerivedBaseAddress[2]);

std::cout << "Calling Name" << std::endl;
derived->Name();

OverwriteVTablePointer(vtableDerivedBaseAddress, 2, HookName);

std::cout << "Calling Name after hook was installed" << std::endl;
derived->Name();

The new code that hooks the Name function of the derived instance.

Verifying the hook

After running this code, the following new output should be present in the console:

Calling Name
Derived
Calling Name after hook was installed
Hooked Name!
Derived

New console output after adding in the code from above.

This shows that the hook was installed successfully. After replacing the function pointer in the virtual table, the custom HookName function was called, at which point it printed out “Hooked Name!” and invoked the original Name function.

Running the demo

The VirtualTableHook project provides the full implementation that was presented in this section. To inspect the virtual table of the Derived instance, set a breakpoint after the vtableDerivedBaseAddress variable is instantiated. Hover your cursor over vtableDerivedBaseAddress and copy the address that pops up in the context menu, as shown below:

The address that vtableDerivedBaseAddress points to.

Paste the address into Visual Studio’s Memory window, accessed though Debug -> Windows -> Memory from Visual Studio’s menu bar. Make sure to set the memory bytes to be treated as 8-byte integers, as shown in Figure 9.20. This is because you will be looking at 64-bit addresses to functions in the virtual table.

Options for how to view memory content.

After changing how the memory is displayed, there will be four sequential addresses that start at the base address of the virtual table. These are the four virtual table entries of the Derived instance. If you wish to verify this, you can take these addresses and put them in Visual Studio’s Disassembly window. You will find that they resolve to the various virtual functions in the Base or Derived classes.

The memory content at the base of the virtual table when interpreted as 8-byte integers.

While still in a broken state, set a new breakpoint after the call to the OverwriteVTablePointer function that is called from main. Continue execution and let your new breakpoint get hit. In the Memory window, you will notice that the third address in the virtual table was overwritten and is now highlighted in red.

The third entry in the virtual table after being overwritten.

This shows the second index in the virtual table being overwritten. Inspecting this address in the Disassembly window will show that this is the address of the HookName function. This shows that the virtual table hook was successful and that future calls to the Name function will instead result in calls to the HookName function for the instance stored in the derived instance.

Function Hooking: Software Breakpoints (4/7)

Filed under: Programming,Reverse Engineering — admin @ 11:43 PM

Table of Contents:

Software breakpoints are another technique to perform non-invasive function hooking. Unlike hardware breakpoints, there is no limit on the amount of software breakpoints that you can set. The downside, however, is that using software breakpoints can greatly reduce the performance of the application that is being monitored. As their name implies, these breakpoints are not set by any hardware registers; instead, they rely on changing the memory page permissions of executable code.

Installing the hook

To set a software breakpoint, the page that the target instruction is on must be a guard page, meaning that its page protection flags must have PAGE_GUARD set. Once an instruction in a guard page is executed, the program will raise a STATUS_GUARD_PAGE_VIOLATION exception. Doing this in code is rather straightforward since the Windows API provides convenient functions to retrieve and change page protections.

void SetMemoryBreakpoint(const void* const targetAddress) {

    DWORD oldProtections{};
    MEMORY_BASIC_INFORMATION memoryInfo{};
    auto result{ VirtualQuery(targetAddress, &memoryInfo,
        sizeof(MEMORY_BASIC_INFORMATION)) };
    if (result == 0) {
        PrintErrorAndExit("VirtualQuery");
    }

    result = VirtualProtect(memoryInfo.BaseAddress, memoryInfo.RegionSize,
        memoryInfo.AllocationProtect | PAGE_GUARD, &oldProtections);
    if (result == 0) {
        PrintErrorAndExit("VirtualProtect");
    }
}

The permissions of the page are retrieved and PAGE_GUARD is added to them.

Defining the exception handler

As with hardware breakpoints, a custom exception handler will need to be installed to catch this exception. Inside the exception handler, you will have access to the thread’s context and can perform the custom hooking logic. The software breakpoint exception handler has the same logical purpose as the hardware breakpoint version; however, the implementation details are a bit different. When a STATUS_GUARD_PAGE_VIOLATION is raised, the PAGE_GUARD protection on the entire page will be removed. This means that if you have a memory breakpoint at an address, the execution of any instruction on the same page as your target address will end up removing your breakpoint!

Overcoming the problem of having the PAGE_GUARD protection removed is a multi-step process. First, on a STATUS_GUARD_PAGE_VIOLATION exception, you can check to see whether the exception address matches the address of the function that you want to hook. If so, then carry out the hook logic as normal. However, before returning from the exception handler, you will need to set the trap flag in the EFlags register. This will put the CPU in single step mode for the next instruction execution. Now, when you return from the exception handler, you will immediately jump back into it with an EXCEPTION_SINGLE_STEP exception. Now you can set the page permissions to have PAGE_GUARD so that your memory breakpoint will continue to get hit in the future. While this may sound like a lot, the implementation is rather straightforward and is shown below:

LONG WINAPI ExceptionHandler(EXCEPTION_POINTERS* const exceptionInfo) {

    if (exceptionInfo->ExceptionRecord->ExceptionCode ==
        STATUS_GUARD_PAGE_VIOLATION) {

        if (exceptionInfo->ExceptionRecord->ExceptionAddress ==
            drawTextAddress) {

            static std::string replacementMessage{ "Hooked Hello World!" };

            // Set to replacement message address
            exceptionInfo->ContextRecord->Rdx = reinterpret_cast<DWORD64>(
                replacementMessage.c_str());
        }

        // Set single step flag so that memory breakpoints are re-enabled
        // on the next instruction execution.
        exceptionInfo->ContextRecord->EFlags |= 0x100;

        return EXCEPTION_CONTINUE_EXECUTION;
    }

    if (exceptionInfo->ExceptionRecord->ExceptionCode ==
        EXCEPTION_SINGLE_STEP) {

        // Re-enable memory breakpoint since a different address might
        // have caused the guard page violation.
        SetMemoryBreakpoint(drawTextAddress);

        return EXCEPTION_CONTINUE_EXECUTION;
    }

    return EXCEPTION_CONTINUE_SEARCH;
}

The implementation of an exception handler for memory breakpoints. This handler performs function hooking by overwriting a parameter that is being passed to the target function.

To make things a bit more exciting, this example will hook a Windows API, DrawTextA, instead of a custom function that was written. This is also done to prevent issues with the function to be hooked and the exception handler residing in the same memory page, as may be the case if you are hooking a function in your own code for some reason. The code for using DrawTextA is shown below:

int main(int argc, char* argv[]) {

    // Add a custom exception handler
    AddVectoredExceptionHandler(true, ExceptionHandler);

    SetMemoryBreakpoint(drawTextAddress);

    auto hDC{ GetDC(nullptr) };
    const auto fontHandle{ GetStockObject(DEFAULT_GUI_FONT) };
    LOGFONT logFont{};
    GetObject(fontHandle, sizeof(LOGFONT), &logFont);

    logFont.lfHeight = 200;

    const auto newFontHandle{ CreateFontIndirect(&logFont) };
    SelectObject(hDC, newFontHandle);

    const std::string message{ "Hello World!" };

    while (true) {
        RECT rect{};
        DrawTextA(hDC, message.c_str(), -1, &rect, DT_CALCRECT);

        DrawTextA(hDC, message.c_str(), -1, &rect, DT_SINGLELINE | DT_NOCLIP);

        std::this_thread::sleep_for(std::chrono::milliseconds(10));
    }

    return 0;
}

The main function of the example code.

Verifying the hook

Instead of outputting to a console, this program will draw the text “Hello World!” on the screen. However, when the memory breakpoint is set, the text will be replaced with “Hooked Hello World!” from the exception handler. This again demonstrates an additional technique to perform function hooking without any code modifications. With no limit set on the amount that you can set, memory breakpoints are the preferred way to hook functions of any application that may be doing integrity checks. As mentioned earlier though, the downside is performance. Since two exceptions (STATUS_GUARD_PAGE_VIOLATION and EXCEPTION_SINGLE_STEP) will be raised for every instruction execution on the memory page of the target address, the program may run noticeably slower.

Running the demo

The SoftwareBreakpoint project provides the full implementation that was presented in this section. As with hardware breakpoints, the best way to see software breakpoints in action is to set a breakpoint in the custom exception handler. Begin by placing two breakpoints: one on the if statement, and the other on the first statement inside of the if block.

Setting breakpoints in the custom exception handler.

After launching the application, look at the value of ExceptionAddress when the breakpoint gets hit. The first time that the breakpoint gets hit, ExceptionAddress should match drawTextAddress and the if block will be entered. Continue execution in the debugger and notice that the breakpoint on the if statement gets hit repeatedly, although ExceptionAddress will be different. This shows how the STATUS_GUARD_PAGE_VIOLATION exception gets raised for every instruction that is on the same memory page as drawTextAddress.

Function Hooking: Hardware Breakpoints (3/7)

Filed under: Programming,Reverse Engineering — admin @ 11:43 PM

Table of Contents:

Inline hooking is nice, but it has one noticeable drawback: you need to overwrite instructions in the program’s memory. While this is typically not an issue, you may run into an application that performs integrity checks on its executable code. Bypassing integrity checks can be a tedious process, but there may be an easier way.

Debug registers

The x86 and x64 architectures provide a set of registers that are useful for debugging. Four debug registers, Dr0, Dr1, Dr2, and Dr3 can hold an address to set a breakpoint on. These breakpoints can be enabled or disabled through the debug control register, Dr7. When a breakpoint has been hit, there is a debug status register, Dr6, that holds information about the breakpoint. The Dr6 and Dr7 registers are described in more detail in the tables below:

BitsDescription
0Breakpoint at address in Dr0 was hit
1Breakpoint at address in Dr1 was hit
2Breakpoint at address in Dr2 was hit
3Breakpoint at address in Dr3 was hit
4-13
14Single-step execution
15 – 63
The bit fields in the Dr6 debug status register that are of interest.
BitsDescription
0Local enable for breakpoint in Dr0
1Global enable for breakpoint in Dr0
2Local enable for breakpoint in Dr1
3Global enable for breakpoint in Dr1
4Local enable for breakpoint in Dr2
5Global enable for breakpoint in Dr2
6Local enable for breakpoint in Dr3
7Global enable for breakpoint in Dr3
8 – 12
13General Detect Enable. Set to 1 on a breakpoint hit.
14 – 15
16 – 17Breakpoint condition for breakpoint in Dr0
18 – 19Breakpoint length for breakpoint in Dr0
20 – 21Breakpoint condition for breakpoint in Dr1
22 – 23Breakpoint length for breakpoint in Dr1
24 – 25Breakpoint condition for breakpoint in Dr2
26 – 27Breakpoint length for breakpoint in Dr2
28 – 29Breakpoint condition for breakpoint in Dr3
30 – 31Breakpoint length for breakpoint in Dr3
32 -63
The bit fields in the Dr7 debug control register that are of interest.
Value (binary)Break condition
00Instruction execution
01Data writes
10I/O reads and writes
11Data reads and writes
The bit values and corresponding break conditions for the Dr7 debug control register condition fields.
Value (binary)Breakpoint length
001 byte
012 bytes
108 bytes
114 bytes
The bit values and corresponding lengths for the Dr7 debug control register length fields.

In Windows, you can see these registers when inspecting the CONTEXT structure, which contains processor-specific register data, among other fields used internally by Windows. The relevant debug register fields are shown below:

typedef struct DECLSPEC_ALIGN(16) DECLSPEC_NOINITALL _CONTEXT {

    // ...


    //
    // Debug registers
    //

    DWORD64 Dr0;
    DWORD64 Dr1;
    DWORD64 Dr2;
    DWORD64 Dr3;
    DWORD64 Dr6;
    DWORD64 Dr7;

    // ...

} CONTEXT, *PCONTEXT;

The supported debug registers in the CONTEXT structure.

Although it may seem unintuitive at first, setting a breakpoint on a function is a way to hook it. When your breakpoint gets hit, execution will transfer to an exception handler, which you will have written. Conceptually, this exception handler can be a hook function; from within the handler, you can completely take over execution just as was done in the inline hooking examples. Hardware breakpoints have a couple of caveats though: since there are only four debug registers, you are limited to hooking four functions at most. Also, hardware breakpoints can only be set by modifying the context of the main thread, which is not something that is provided out of the box by the Windows API.

Getting the main thread id

Fortunately, getting the context of the main thread is not too difficult. The Windows API provides helpful functions to enumerate all threads in a process, and to get additional information about them. One useful bit of information is the threads creation time. You can take advantage of the fact that the main thread will (likely) be the first thread that is created and run when an executable is loaded, meaning it will have the earliest creation time. Knowing this, it is a matter of writing the appropriate code to capture all of the threads, iterate through them, and keep track of the thread with the earliest creation time. The GetMainThreadId function below does just that:

DWORD GetMainThreadId(const HANDLE processHandle) {

    std::shared_ptr<HPSS> snapshot(new HPSS{}, [&](HPSS* snapshotPtr) {
        PssFreeSnapshot(processHandle, *snapshotPtr);
    });

    auto result{ PssCaptureSnapshot(processHandle,
        PSS_CAPTURE_THREADS, 0, snapshot.get()) };
    if (result != ERROR_SUCCESS) {
        PrintErrorAndExit("PssCaptureSnapshot");
    }

    std::shared_ptr<HPSSWALK> walker(new HPSSWALK{}, [&](HPSSWALK* walkerPtr) {
        PssWalkMarkerFree(*walkerPtr);
    });

    result = PssWalkMarkerCreate(nullptr, walker.get());
    if (result != ERROR_SUCCESS) {
        PrintErrorAndExit("PssWalkMarkerCreate");
    }

    DWORD mainThreadId{};
    FILETIME lowestCreateTime{ MAXDWORD, MAXDWORD };

    PSS_THREAD_ENTRY thread{};

    // Iterate through the threads and keep track of the one
    // with the lowest creation time.
    while (PssWalkSnapshot(*snapshot, PSS_WALK_THREADS,
        *walker, &thread, sizeof(thread)) == ERROR_SUCCESS) {
        if (CompareFileTime(&lowestCreateTime, &thread.CreateTime) == 1) {
            lowestCreateTime = thread.CreateTime;
            mainThreadId = thread.ThreadId;
        }
    }

    return mainThreadId;
}

The GetMainThreadId function iterates through all threads in a process and returns the thread ID with the earliest creation time.

This function works by calling PssCaptureSnapshot to capture a snapshot of all of the threads for the process handle that was passed in. After creating the snapshot, an iterator is created with PssWalkMarkerCreate; this iterator will be used in PssWalkSnapshot to traverse the list of threads. When traversing the thread list, the code uses CompareFileTime to compare the current thread’s creation time with the lowest known creation time. If the current thread has an earlier creation time, it becomes the candidate to be the main thread. This will continue until all threads have been traversed, at which point the value of mainThreadId will be the identifier of the main thread.

Installing the hook

Having obtained the main thread ID, the next step is to set and enable the appropriate debug registers to install the function hook. This is shown in the code below:

bool SetDebugBreakpoint(const HANDLE& mainThreadHandle,
    const void* const targetAddress) {

    CONTEXT mainThreadContext {
        .ContextFlags = CONTEXT_DEBUG_REGISTERS,

        // Set an address to break at on Dr0
        .Dr0 = reinterpret_cast<DWORD64>(targetAddress),
        
        // Set the debug control register to enable the breakpoint in Dr0
        .Dr7 = (1 << 0)
    };

    // Suspend the thread before setting its context
    SuspendThread(mainThreadHandle);

    // Set the main threads context
    auto result{ SetThreadContext(mainThreadHandle, &mainThreadContext) };
    if (result == 0) {
        PrintErrorAndExit("SetThreadContext");
    }

    // Resume the thread after setting its context
    ResumeThread(mainThreadHandle);

    return result != 0;
}

int main(int argc, char* argv[]) {

    std::async([]() {
        const auto mainThreadId{ GetMainThreadId(GetCurrentProcess()) };
        const auto mainThreadHandle{ OpenThread(
            THREAD_SET_CONTEXT | THREAD_SUSPEND_RESUME,
            false, mainThreadId) };

        if (mainThreadHandle == nullptr) {
            PrintErrorAndExit("OpenThread");
        }

        // Add a custom exception handler
        AddVectoredExceptionHandler(true, ExceptionHandler);

        if (!SetDebugBreakpoint(mainThreadHandle, DisplayMessageOnInterval)) {
            std::cerr << std::format("Failed to set hardware breakpoint on 0x{:X}",
                reinterpret_cast<DWORD_PTR>(DisplayMessageOnInterval))
                << std::endl;
        }

        CloseHandle(mainThreadHandle);

    }).wait();

    while (true) {
        DisplayMessageOnInterval("Hello World!");
        std::this_thread::sleep_for(std::chrono::seconds(5));
    }

    return 0;
}

Setting a debug breakpoint on the DisplayMessageOnInterval function.

Starting at the main function, the first thing to notice is that installing the function hooks happens from a different thread. This is because a thread must be suspended to properly have its context changed, and the main thread cannot suspend and resume itself. After obtaining the main thread ID, a handle to the thread is opened with the THREAD_SET_CONTEXT and THREAD_SUSPEND_RESUME access rights. As their names imply, this grants the ability to set the threads context and suspend and resume the thread. Once the thread handle is opened, a custom exception handler is installed with the AddVectoredExceptionHandler call. This exception handler that will serve as the hook function and will be responsible for intercepting the call to the target function.

The SetDebugBreakpoint function performs the actual work of setting the hardware breakpoint. The function begins by initializing a custom CONTEXT structure. This structure sets the ContextFlags field to CONTEXT_DEBUG_REGISTERS, denoting that the debug registers will be modified. The Dr0 field is set to the target address to hook, and the breakpoint is enabled by setting the appropriate field in the Dr7 debug control register. Once this custom context is initialized, the main thread is suspended so that its context can be changed. After the main thread is suspended, the custom context is set with SetThreadContext, and the main thread is resumed.

Defining the exception handler

At this point the hardware breakpoint has been enabled and the custom exception handler will be called when the DisplayMessageOnInterval function is called. As in the previous examples, you can change the parameter being passed in to DisplayMessageOnInterval through the hook. The code for this is shown below:

LONG WINAPI ExceptionHandler(EXCEPTION_POINTERS* const exceptionInfo) {

    if (exceptionInfo->ExceptionRecord->ExceptionCode == EXCEPTION_SINGLE_STEP) {
        
        if (exceptionInfo->ContextRecord->Dr6 & 0x1) {
            static std::string replacementMessage{ "Hooked Hello World!" };

            // Write in replacement message
            auto* firstParameter{ reinterpret_cast<std::string*>(
                exceptionInfo->ContextRecord->Rcx) };
            *firstParameter = replacementMessage;

            // Set the resume flag before continuing execution
            exceptionInfo->ContextRecord->EFlags |= 0x10000;
        }

        return EXCEPTION_CONTINUE_EXECUTION;
    }

    return EXCEPTION_CONTINUE_SEARCH;
}

The custom exception handler that serves as the hook function entry point.

On Windows, when a hardware breakpoint is hit, the exception code will be EXCEPTION_SINGLE_STEP. The custom exception handler checks for this, then checks if the first bit is set in Dr6, which will be the case if the breakpoint in the Dr0 register has been hit. If this is so, then the DisplayMessageOnInterval function has been called. At this point, following the x64 calling convention, the first argument to the function will be in the RCX register. Knowing this, the address in RCX can be cast to a pointer-to-string, and the value can then be reassigned. Lastly, the resume flag is set in the EFlags field to indicate that execution can continue; failure to do this will result in an infinite loop.

Verifying the hook

After running this code, there should be a “Hooked Hello World” message displayed to the console, as was the case in the previous sections dealing with inline hooks. This demonstrates that function hooking can be done in a non-invasive way with hardware breakpoints; the assembly instructions of the DisplayMessageOnInterval function have not changed at all, but the function was successfully hooked.

Running the demo

The HardwareBreakpoint project provides the full implementation that was presented in this section. To see hardware breakpoints in action, set a breakpoint in Visual Studio on the first line that is executed after the Dr6 register is checked. This block will execute if the hardware breakpoint has been hit, which should happen almost immediately after launching the demo application.

The hardware breakpoint getting hit.

While inside this block, you can inspect the address stored in the Dr0 register to make sure that it matches the address of the DisplayMessageOnInterval function. Additionally, you can match up the set bits in the Dr6 register to validate that the hardware breakpoint was triggered with the correct flags. To get these values, hover over the ContextRecord field in the if statement. Visual Studio will display a context menu that shows the content of the CONTEXT structure at the time the breakpoint was hit.

« Newer PostsOlder Posts »

Powered by WordPress