RCE Endeavors 😅

June 18, 2023

DLL Injection: Manual Mapping (5/5)

Filed under: Programming,Reverse Engineering — admin @ 7:43 PM

Table of Contents:

Manual mapping is an even stealthier technique to perform DLL injection. This technique involves writing a DLL into a process’s memory, fixing up its relocations, and starting a thread at its entry point. You can think of manual mapping as basically implementing your own lightweight version of LoadLibraryA. This lightweight implementation is what gives the technique its stealth: you are only implementing the bare essentials to get your DLL loaded, as opposed to what the Windows implementation of LoadLibraryA would do, which is load your DLL but also register its existence with various Windows data structures. With manual mapping, your DLL can run inside of another process without that process being able to easily detect your DLLs presence.

Mapping the DLL bytes to the target process

To begin performing manual mapping, you must first get the DLL file bytes and write them to the target process.

std::vector<char> GetDllFileBytes(const std::string& fullModulePath) {

    std::ifstream fileStream(fullModulePath.c_str(),
        std::ios::in | std::ios::binary | std::ios::ate);

    const auto fileSize{ fileStream.tellg() };
    fileStream.seekg(0, std::ios::beg);

    std::vector<char> fileBytes(fileSize);
    fileStream.read(fileBytes.data(), fileSize);

    return fileBytes;
}

void* WriteDllFileBytesToProcess(const HANDLE processHandle, 
    const std::vector<char>& fileBytes) {

    const auto dosHeader{ reinterpret_cast<const IMAGE_DOS_HEADER*>(
        fileBytes.data()) };
    const auto ntHeader{ reinterpret_cast<const IMAGE_NT_HEADERS*>(
        fileBytes.data() + dosHeader->e_lfanew) };

    const auto remoteBaseAddress{ VirtualAllocEx(processHandle, nullptr,
        ntHeader->OptionalHeader.SizeOfImage, MEM_RESERVE | MEM_COMMIT,
        PAGE_EXECUTE_READWRITE) };
    if (remoteBaseAddress == nullptr) {
        PrintErrorAndExit("VirtualAllocEx");
    }

    const auto* currentSection{ IMAGE_FIRST_SECTION(ntHeader) };
    for (size_t i{}; i < ntHeader->FileHeader.NumberOfSections; i++) {

        SIZE_T bytesWritten{};
        auto result{ WriteProcessMemory(processHandle,
            static_cast<char*>(remoteBaseAddress) + currentSection->VirtualAddress,
            fileBytes.data() + currentSection->PointerToRawData,
            currentSection->SizeOfRawData, &bytesWritten) };
        if (result == 0 || bytesWritten == 0) {
            PrintErrorAndExit("WriteProcessMemory");
        }

        currentSection++;
    }

    SIZE_T bytesWritten{};
    const auto result{ WriteProcessMemory(processHandle, remoteBaseAddress,
        fileBytes.data(), REMOTE_PE_HEADER_ALLOC_SIZE, &bytesWritten) };
    if (result == 0 || bytesWritten == 0) {
        PrintErrorAndExit("WriteProcessMemory");
    }

    return remoteBaseAddress;
}

The GetDllFileBytes function reads the DLL into a buffer. The WriteDllFileBytesToProcess function will write the bytes into a target processes address space.

The GetDllFileBytes takes in the absolute path of the DLL and is responsible for reading the file bytes into a vector that is returned to the caller. Once the file bytes are obtained, the WriteDllFileBytesToProcess function will write these bytes into the target processes address space. The WriteDllFileBytesToProcess function begins by calling VirtualAllocEx to allocate a block of memory in the target process. The size of this block is equal to the SizeOfImage field of the Portable Executable (PE) header, which denotes how big the loaded DLL will be in memory. Each section, as defined in the PE section header, is written into the block. Lastly, the PE header is written into the base address of the block.

Base address relocation

With the DLL written into memory, the fun part of implementing the loader can begin. The loader will need to perform three steps before the DLL’s DllMain function can be called: base relocation of the DLL, resolving the imports of the DLL and writing in their absolute addresses to the import address table, and invoking any thread-local storage (TLS) callbacks that are present in the DLL. As in the context hijacking technique, this stub will be written into the target process and will be executed in order to inject the DLL. However, fortunately, the stub can be written in C++ instead of needing x64 assembly.

Since the stub will be written in C++ and then have its assembly instructions written to the target process, the stub must be coded in such a way that the compiler generates position-independent code (PIC). This means that the compiler will generate a stub that can execute regardless of where it is written into the memory, as will be the case since VirtualAllocEx will likely return a different address each time. To get the compiler to generate the position-independent assembly code, you cannot call other functions, use any global variables, or reference anything outside of the functions own scope. The only allowed external reference that the stub will have will be its argument, which will be a pointer to any values that it needs.

using LoadLibraryAPtr = HMODULE(__stdcall*)(LPCSTR lpLibFileName);
using GetProcAddressPtr = FARPROC(__stdcall*)(HMODULE hModule, LPCSTR  lpProcName);

typedef struct {
    void* const remoteDllBaseAddress;
    LoadLibraryAPtr remoteLoadLibraryAAddress;
    GetProcAddressPtr remoteGetProcAddressAddress;
} RelocationStubParameters;

The RelocationStubParameters structure holds information that the stub will need.

These parameters will be filled out and written into the target processes address space, so that they are available for use within the stub itself. As their names suggest, the three pieces of information that the stub will need is the DLL base address, and the address of the LoadLibraryA and GetProcAddress functions. With the parameters identified, the stub can be implemented.

void RelocationStub(RelocationStubParameters* parameters) {

    const auto dosHeader{ reinterpret_cast<IMAGE_DOS_HEADER*>(
        parameters->remoteDllBaseAddress) };
    const auto ntHeader{ reinterpret_cast<IMAGE_NT_HEADERS*>(
        reinterpret_cast<DWORD_PTR>(
            parameters->remoteDllBaseAddress) + dosHeader->e_lfanew) };

    const auto relocationOffset{ reinterpret_cast<DWORD_PTR>(
        parameters->remoteDllBaseAddress) - ntHeader->OptionalHeader.ImageBase };

    typedef struct {
        WORD offset : 12;
        WORD type : 4;
    } RELOCATION_INFO;

    const auto* baseRelocationDirectoryEntry{
        reinterpret_cast<IMAGE_BASE_RELOCATION*>(
            reinterpret_cast<DWORD_PTR>(parameters->remoteDllBaseAddress) +
            ntHeader->OptionalHeader.DataDirectory[IMAGE_DIRECTORY_ENTRY_BASERELOC]
                .VirtualAddress) };

    while (baseRelocationDirectoryEntry->VirtualAddress != 0) {

        const auto relocationCount{ 
            (baseRelocationDirectoryEntry->SizeOfBlock – 
            sizeof(IMAGE_BASE_RELOCATION)) / sizeof(RELOCATION_INFO) };

        const auto* baseRelocationInfo{ reinterpret_cast<RELOCATION_INFO*>(
            reinterpret_cast<DWORD_PTR>(
                baseRelocationDirectoryEntry) + sizeof(RELOCATION_INFO)) };

        for (size_t i{}; i < relocationCount; i++, baseRelocationInfo++) {
            if (baseRelocationInfo->type == IMAGE_REL_BASED_DIR64) {
                const auto relocFixAddress{ reinterpret_cast<DWORD*>(
                    reinterpret_cast<DWORD_PTR>(parameters->remoteDllBaseAddress) +
                    baseRelocationDirectoryEntry->VirtualAddress + 
                    baseRelocationInfo->offset) };
                *relocFixAddress += static_cast<DWORD>(relocationOffset);
            }
        }

        baseRelocationDirectoryEntry = reinterpret_cast<IMAGE_BASE_RELOCATION*>(
            reinterpret_cast<DWORD_PTR>(baseRelocationDirectoryEntry) +
            baseRelocationDirectoryEntry->SizeOfBlock);
    }

    const auto* baseImportsDirectory{
        reinterpret_cast<IMAGE_IMPORT_DESCRIPTOR*>(
            reinterpret_cast<DWORD_PTR>(parameters->remoteDllBaseAddress) +
            ntHeader->OptionalHeader.DataDirectory[IMAGE_DIRECTORY_ENTRY_IMPORT]
                .VirtualAddress) };

    for (size_t index{}; baseImportsDirectory[index].Characteristics != 0; index++){

        const auto* const moduleName{ RvaToPointer(char*,
            parameters->remoteDllBaseAddress,
            baseImportsDirectory[index].Name) };
        const auto loadedModuleHandle{
            parameters->remoteLoadLibraryAAddress(moduleName) };

        auto* addressTableEntry{ RvaToPointer(IMAGE_THUNK_DATA*,
            parameters->remoteDllBaseAddress, 
            baseImportsDirectory[index].FirstThunk) };
        const auto* nameTableEntry{ RvaToPointer(IMAGE_THUNK_DATA*,
            parameters->remoteDllBaseAddress, 
            baseImportsDirectory[index].OriginalFirstThunk) };

        if (nameTableEntry == nullptr) {
            nameTableEntry = addressTableEntry;
        }

        for (; nameTableEntry->u1.Function != 0;
            nameTableEntry++, addressTableEntry++) {

            const auto* const importedFunction{ RvaToPointer(IMAGE_IMPORT_BY_NAME*,
                parameters->remoteDllBaseAddress, nameTableEntry->u1.AddressOfData) 
            };

            if (nameTableEntry->u1.Ordinal & IMAGE_ORDINAL_FLAG) {

                addressTableEntry->u1.Function = reinterpret_cast<ULONGLONG>(
                    parameters->remoteGetProcAddressAddress(loadedModuleHandle,
                    MAKEINTRESOURCEA(nameTableEntry->u1.Ordinal)));
            }
            else {
                addressTableEntry->u1.Function = reinterpret_cast<ULONGLONG>(
                    parameters->remoteGetProcAddressAddress(loadedModuleHandle,
                    importedFunction->Name));
            }   
        }
    }

    if (ntHeader->OptionalHeader.DataDirectory[IMAGE_DIRECTORY_ENTRY_TLS].Size > 0){
        const auto* baseTlsEntries{
            reinterpret_cast<IMAGE_TLS_DIRECTORY*>(
                reinterpret_cast<DWORD_PTR>(parameters->remoteDllBaseAddress) +
                ntHeader->OptionalHeader.DataDirectory[IMAGE_DIRECTORY_ENTRY_TLS]
                    .VirtualAddress) };

        const auto* tlsCallback{ reinterpret_cast<PIMAGE_TLS_CALLBACK*>(
            baseTlsEntries->AddressOfCallBacks) };
        while (tlsCallback != nullptr) {
            (*tlsCallback)(parameters->remoteDllBaseAddress, DLL_PROCESS_ATTACH,
                nullptr);
            tlsCallback++;
        }
    }

    using DllMainPtr = BOOL(__stdcall*)(HINSTANCE hinstDLL, 
        DWORD fdwReason, LPVOID lpvReserved);

    const auto DllMain{ reinterpret_cast<DllMainPtr>(
        reinterpret_cast<DWORD_PTR>(parameters->remoteDllBaseAddress) +
        ntHeader->OptionalHeader.AddressOfEntryPoint) };

    DllMain(reinterpret_cast<HINSTANCE>(parameters->remoteDllBaseAddress),
        DLL_PROCESS_ATTACH, nullptr);
}

The relocation stub implementation.

The stub will begin by performing base relocation of the DLL by first getting the start of the base relocation table. For every entry in the table, the field containing the number of relocations that are present is retrieved. Then, the relocation type is checked against IMAGE_REL_BASED_DIR64 to see if it is a relocation that applies to a 64-bit field. If that is the case, then the address is adjusted to compensate for the DLLs load address and the relocation offset. This process continues in a loop for each base relocation entry in the table.

Fixing imports

After the base relocation has been performed, the imports of the DLL need to be fixed up with absolute addresses. To do this, the stub gets the base of the import directory. For each import, the stub will find the module that the import belongs to and load it, then iterate over the import name and import address tables. The GetProcAddress function will be called for each import name and ordinal, and the absolute address will be written into the import address table entry that corresponds to the import. There may be what appears to be a function call to RvaToPointer, but since the stub needs to be position independent, RvaToPointer has been redefined as a macro.

#define RvaToPointer(type, baseAddress, offset) \
    reinterpret_cast<type>( \
        reinterpret_cast<DWORD_PTR>(baseAddress) + offset)

The RvaToPointer macro to convert a relative virtual address to a pointer.

Invoking TLS callbacks

Lastly, the stub needs to invoke any TLS callbacks that are present in the DLL. This is done by getting the base of the TLS directory, which will have an array of function pointers. These function pointers are the TLS callbacks, and are each invoked in turn. After all TLS callbacks have been called, the DllMain function can then be called. This will be the entry point of the DLL and will call into your defined DllMain after running some startup initialization functions.

Writing the relocation stub

With the stub generated, it can now be written in to the target process.

std::pair<void*, void*> WriteRelocationStubToTargetProcess(
    const HANDLE processHandle, const RelocationStubParameters& parameters) {

    auto* const remoteParametersAddress{ VirtualAllocEx(processHandle, nullptr,
        REMOTE_RELOC_STUB_ALLOC_SIZE, MEM_RESERVE | MEM_COMMIT, PAGE_READWRITE) };
    if (remoteParametersAddress == nullptr) {
        PrintErrorAndExit("VirtualAllocEx");
    }

    SIZE_T bytesWritten{};
    auto result{ WriteProcessMemory(processHandle, remoteParametersAddress,
        &parameters, sizeof(RelocationStubParameters),
        &bytesWritten) };
    if (result == 0 || bytesWritten == 0) {
        PrintErrorAndExit("WriteProcessMemory");
    }

    auto* const remoteRelocationStubAddress{ VirtualAllocEx(processHandle, nullptr,
        REMOTE_RELOC_STUB_ALLOC_SIZE,
        MEM_RESERVE | MEM_COMMIT, PAGE_EXECUTE_READWRITE) };
    if (remoteRelocationStubAddress == nullptr) {
        PrintErrorAndExit("VirtualAllocEx");
    }

    result = WriteProcessMemory(processHandle, remoteRelocationStubAddress, 
        RelocationStub, REMOTE_RELOC_STUB_ALLOC_SIZE, &bytesWritten);
    if (result == 0 || bytesWritten == 0) {
        PrintErrorAndExit("WriteProcessMemory");
    }

    return std::make_pair(remoteRelocationStubAddress, remoteParametersAddress);
}

The WriteRelocationStubToTargetProcess function will write in the parameters and relocation stub to a target process.

The WriteRelocationStubToTargetProcess takes in a process handle to the target process and a reference to the stub parameters. The stub parameters and the stub itself will be written into the target process at two distinct memory blocks. The addresses of these blocks will then be returned as a pair to the caller.

Creating the remote thread

Now all that is left to do is to run the stub. This will involve creating a thread for the DLL to run in and is accomplished by calling CreateRemoteThreadEx, passing in the stub address as the thread entry point, and the stub parameters address as the thread parameters.

void InjectByManualMapping(const DWORD processId,
    const std::string& fullModulePath) {

    const auto processHandle{ GetTargetProcessHandle(processId) };
    const auto fileBytes{ GetDllFileBytes(fullModulePath) };

    auto* const remoteDllBaseAddress{ WriteDllFileBytesToProcess(
        processHandle, fileBytes) };
    auto* const remoteLoadLibraryAddress{ GetRemoteModuleFunctionAddress(
        "kernel32.dll", "LoadLibraryA", processId) };
    auto* const remoteGetProcAddressAddress{ GetRemoteModuleFunctionAddress(
        "kernel32.dll", "GetProcAddress", processId) };

    const RelocationStubParameters parameters{
        .remoteDllBaseAddress = remoteDllBaseAddress,
        .remoteLoadLibraryAAddress = reinterpret_cast<LoadLibraryAPtr>(
            remoteLoadLibraryAddress),
        .remoteGetProcAddressAddress = reinterpret_cast<GetProcAddressPtr>(
            remoteGetProcAddressAddress)
    };

    const auto relocationInfo{
        WriteRelocationStubToTargetProcess(processHandle, parameters) };

    const auto remoteThread{ CreateRemoteThreadEx(processHandle, nullptr, 0,
        reinterpret_cast<LPTHREAD_START_ROUTINE>(relocationInfo.first),
        relocationInfo.second, 0, nullptr, 0) };
    if (remoteThread == nullptr) {
        PrintErrorAndExit("CreateRemoteThreadEx");
    }
}

int main(int argc, char* argv[]) {

    const auto fullModulePath{ GetInjectedDllPath("Ch10_GenericDll.dll") };

    const auto processId{ GetTargetProcessAndThreadId(
        "Untitled - Notepad").first };

    InjectByManualMapping(processId, fullModulePath);

    return 0;
}

The manual mapper loader implementation.

The remote thread will begin its execution at the address of the relocation stub, with a pointer to its parameters as the argument to the stub. The stub will begin execution, perform the appropriate fixups for the DLL, and call the DllMain function. At the point that the DllMain function is called, the DLL will have its own thread to run in and has been fully set up to run inside the target process.

Running the demo

Note: If you are using the new UWP Notepad that is in the latest Windows version, you will need to downgrade to the classic version for the demo to work.

The ManualMapper project provides the full implementation that was presented in this section. To test this locally, build both the GenericDll project and the ManualMapper loader project.

* The ManualMapper project only builds in Release mode. This is to remove compiler flags that would cause the relocation stub to generate code that isn’t fully position independent.

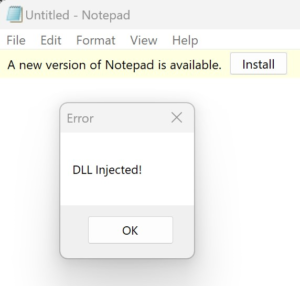
After a successful build, launch Notepad and then the loader application. You will see the familiar “DLL Injected!” message box pop up. Do not dismiss this message box yet. Instead, open up Process Hacker and find the notepad.exe process. Looking in the Modules tab, you should see that GenericDll.dll is not listed, despite clearly being loaded and executing since there is a message box popup. This shows that the DLL was successfully injected into the notepad.exe process, but in such a way that it is not detectable.

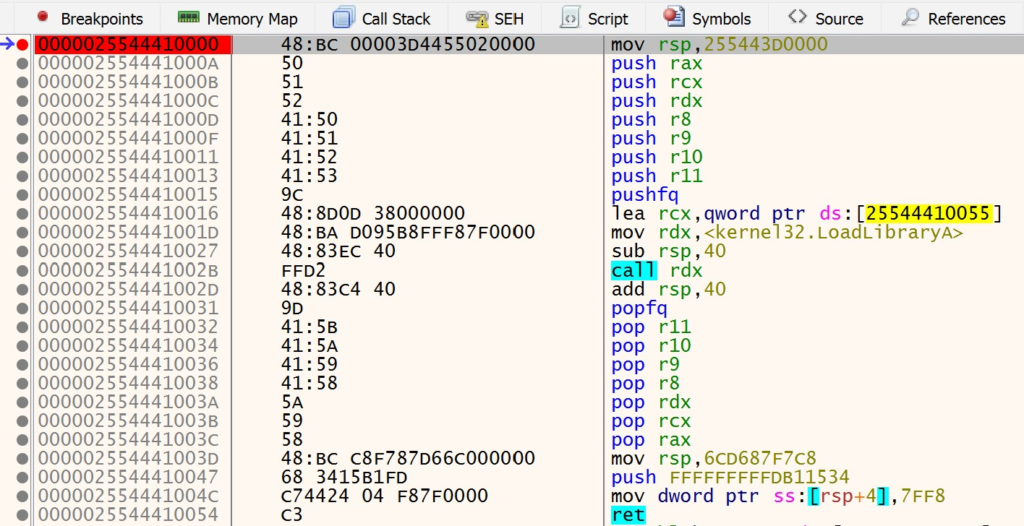
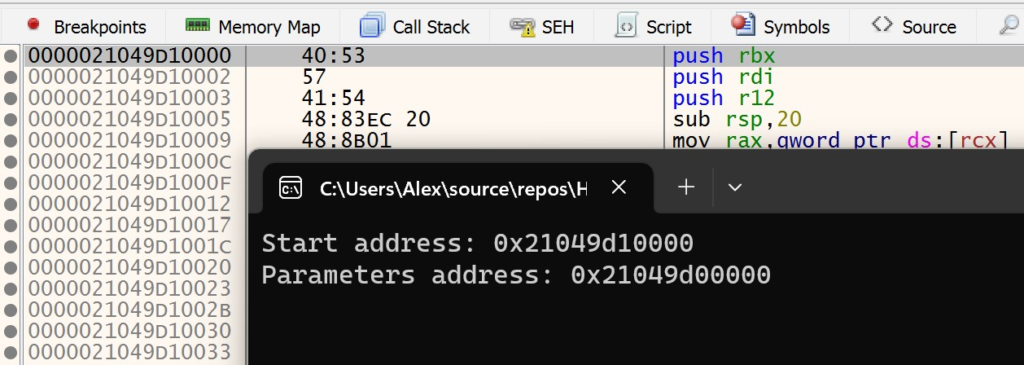
To really see this for yourself, you can watch the manual mapping relocation stub execute in the Notepad process. As before, open x64dbg and attach to the notepad.exe process. Make sure that x64dbg is not in a broken state and that Notepad is running. Navigate to Visual Studio and set a breakpoint on the CreateRemoteThreadEx call. Launch the loader application and copy the start address that the loader outputs to the console. Navigate to this address in x64dbg. You should see the instructions of the relocation stub as shown below.

The relocation stub instructions at the stub start address.

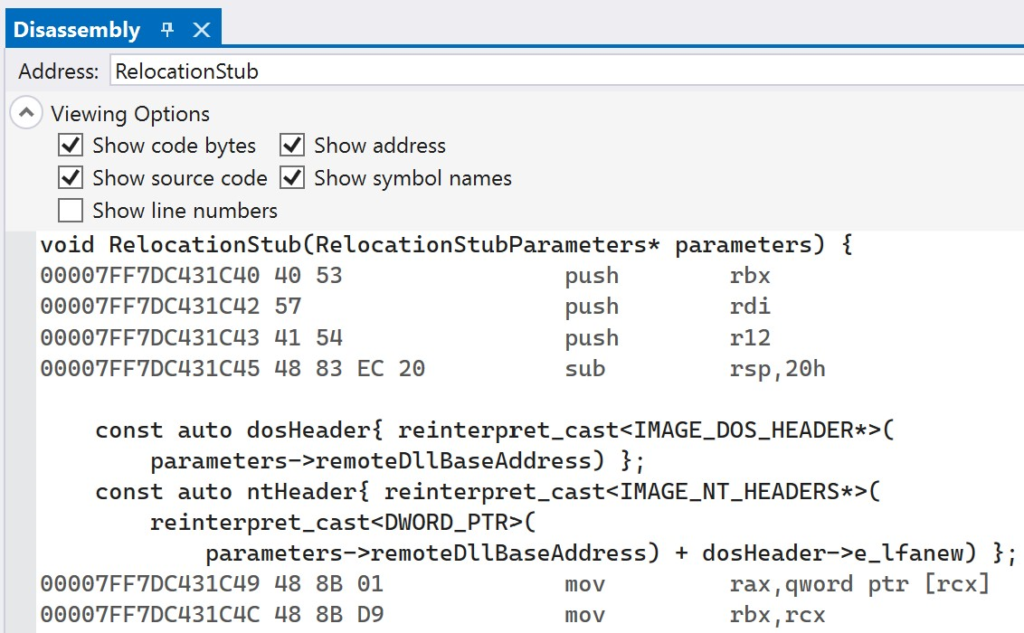
Set a breakpoint on the first instruction and navigate back to Visual Studio. Before resuming execution in Visual Studio, open the Disassembly window. Type in RelocationStub in the Address window to navigate to the assembly instructions for the relocation stub.

The generated RelocationStub assembly instructions, along with their source mappings.

Copy and paste the entire disassembly of the RelocationStub function to another text editor. This will allow you to easily map what you see in x64dbg with the original source code lines. After doing this, resume execution of the loader in Visual Studio. The loader will create the remote thread to start execution of the relocation stub and then exit. Navigate back to x64dbg after the loader has finished execution and terminated. At this point, your breakpoint should be hit. You can step through the relocation stub in x64dbg, while referencing the original source code that the instructions map back to. This will make it easier to understand what is happening and how the relocation stub performs its logic while running in the context of the Notepad process.
DLL Injection: Thread Context Hijacking (4/5)

Filed under: Programming,Reverse Engineering — admin @ 7:43 PM

Table of Contents:

Thread context hijacking is a lesser used technique that makes a tradeoff: a stealthier way to perform DLL injection, but at the cost of a more complex loader implementation. Instead of creating a new thread to load the DLL, thread context hijacking involves changing the state of an existing thread to perform the loading. This is done by first suspending all threads in the process, and then calling GetThreadContext on the target thread that will be loading your DLL. Once the context is obtained, two registers will be changed: the current instruction pointer, stored in the Rip field of the CONTEXT structure, and the current stack pointer, stored in the Rsp field.

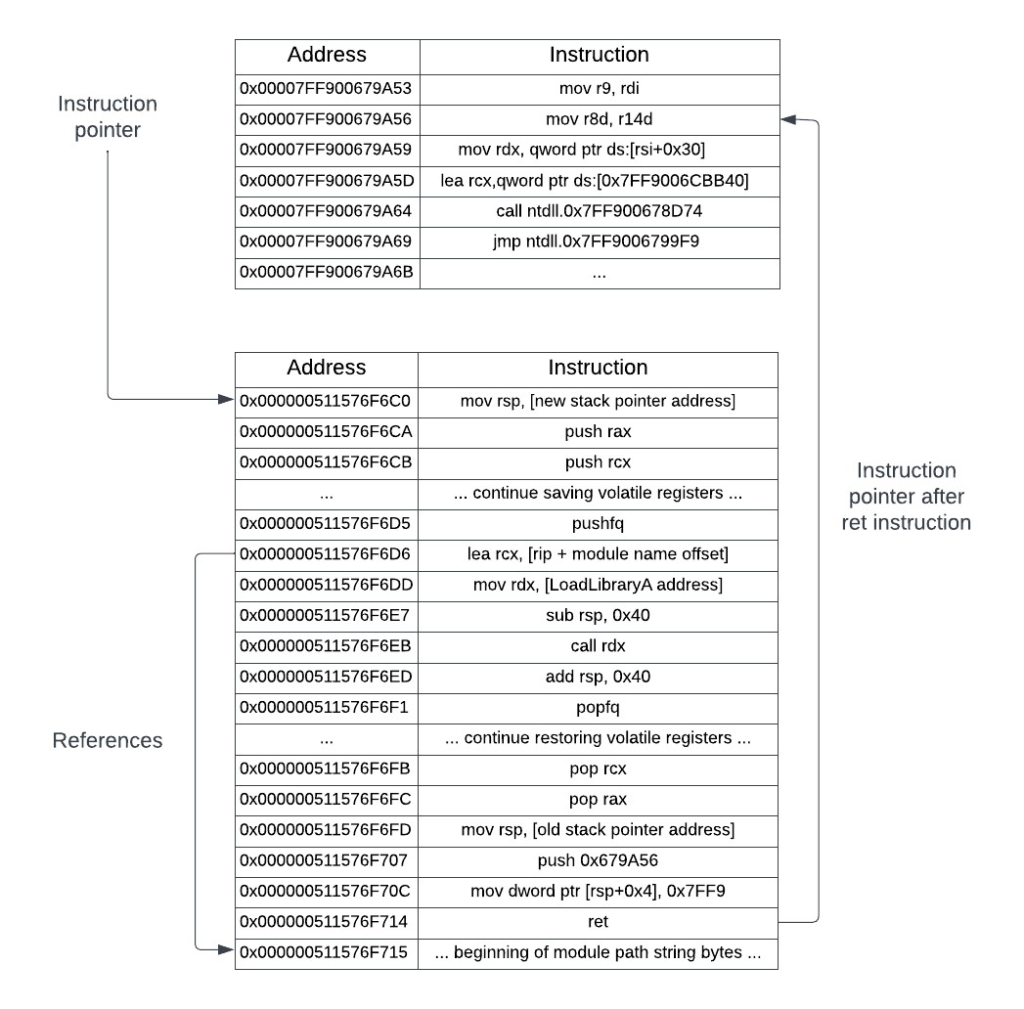
The instruction pointer will be changed to point to an address that has a stub of assembly instructions that will be written into the process by the loader. These instructions will save the thread state, call LoadLibraryA to load your DLL, restore the thread state, and pass execution back to the address of the original instruction pointer, as if nothing had ever happened. The stack pointer will be changed to point to a newly allocated block of memory that will hold the stack space required to store the thread state, and provide room for the LoadLibraryA routine to carry out its internal functionality as well. Changing the stack pointer is not mandatory to perform the context hijacking; using the existing memory of where the thread’s stack is located at can work as well, though it can be more error prone and more difficult to debug. The following figures will visually show what will be happening to perform the thread context hijacking. Initially, a thread will be in a suspended state, with its instruction pointer at some memory location.

The state of a thread when it was suspended.

The loader process will retrieve the instruction pointer and stack pointer and use these two addresses to create the stub instructions. The loader will then set the instruction pointer to the start address of the stub. The stub loads the library, restores the old stack pointer, and passes control back to the original instruction pointer.

Control flow after the assembly stub has been written in and the thread resumes execution.

Getting the target process handle

Having seen what will happen, it is now time to implement it. The first step is to get a handle to the target process with the appropriate access rights. The loader will be performing suspend and resume operations on the target processes threads and writing into the target processes address space. This will require a different set of permissions than those required for the CreateRemoteThreadEx implementation.

HANDLE GetTargetProcessHandle(const DWORD processId) {

    const auto processHandle{ OpenProcess(
        PROCESS_SUSPEND_RESUME | PROCESS_VM_OPERATION |
        PROCESS_VM_WRITE | PROCESS_QUERY_INFORMATION, false, processId) };
    if (processHandle == nullptr) {
        PrintErrorAndExit("OpenProcess");
    }

    return processHandle;
}

Retrieving a handle to the target process.

The PROCESS_SUSPEND_RESUME permission, as its name implies, is needed to successfully perform the suspend and resume operations on the target processes threads. As in the CreateRemoteThreadEx implementation, the other three permissions are needed to write into the target processes address space.

Suspending the process

With a handle to the process, the next step is to suspend all of the running threads. There are a couple of ways to do this: the long way and the short way. The long way involves creating a snapshot of the process’s threads, enumerating each thread in the snapshot, opening a handle to the thread, and then suspending the thread with a call to SuspendThread. Resuming each thread will involve the same series of steps, but calling ResumeThread instead. The short way is to use an undocumented native API to suspend or resume the entire process for you. Inside of ntdll.dll there are two exported functions: NtSuspendProcess and NtResumeProcess. As their names suggest, these functions will suspend or resume all threads in a process. The definitions for these two functions are provided below:

using NtSuspendProcessPtr = int(__stdcall*)(HANDLE processHandle);
using NtResumeProcessPtr = int(__stdcall*)(HANDLE processHandle);

The prototypes for NtSuspendProcess and NtResumeProcess.

Addresses to these native APIs can be retrieved from ntdll.dll via GetProcAddress.

template <typename NativeFunction>
NativeFunction GetNativeFunctionPtr(const std::string& functionName) {

    const auto ntdllHandle{ GetModuleHandleA("ntdll.dll") };
    if (ntdllHandle == nullptr) {
        PrintErrorAndExit("GetModuleHandleA");
    }

    return reinterpret_cast<NativeFunction>(
        GetProcAddress(ntdllHandle, functionName.c_str()));
}

A generic function to obtain a function pointer from ntdll.dll.

Retrieving the thread context

Next, the thread contexts can be retrieved. Since all of the threads are suspended, their contexts can be changed. The code below will retrieve the contexts for each thread in the target process; these contexts are returned as a pair consisting of the thread ID and the threads corresponding CONTEXT structure.

std::vector<std::pair<DWORD, CONTEXT>> GetTargetProcessThreadContexts(
    const HANDLE processHandle) {

    const std::shared_ptr<HPSS> snapshot(new HPSS{}, [&](HPSS* snapshotPtr) {
        PssFreeSnapshot(processHandle, *snapshotPtr);
        });

    auto result{ PssCaptureSnapshot(processHandle,
        PSS_CAPTURE_THREADS | PSS_CAPTURE_THREAD_CONTEXT,
        CONTEXT_ALL, snapshot.get()) };
    if (result != ERROR_SUCCESS) {
        PrintErrorAndExit("PssCaptureSnapshot");
    }

    const std::shared_ptr<HPSSWALK> walker(new HPSSWALK{},
        [&](HPSSWALK* walkerPtr) {
        PssWalkMarkerFree(*walkerPtr);
    });

    result = PssWalkMarkerCreate(nullptr, walker.get());
    if (result != ERROR_SUCCESS) {
        PrintErrorAndExit("PssWalkMarkerCreate");
    }

    std::vector<std::pair<DWORD, CONTEXT>> threadIdWithContext{};
    PSS_THREAD_ENTRY thread{};

    while (PssWalkSnapshot(*snapshot, PSS_WALK_THREADS,
        *walker, &thread, sizeof(thread)) == ERROR_SUCCESS) {
        threadIdWithContext.push_back(std::make_pair(
            thread.ThreadId, *thread.ContextRecord));
    }

    return threadIdWithContext;
}

The GetTargetProcessThreadContexts function retrieves the thread ID and its accompanying CONTEXT structure.

The GetTargetProcessThreadContexts function works by creating a process snapshot using PssCaptureSnapshot. The PSS_CAPTURE_THREADS and PSS_CAPTURE_THREAD_CONTEXT capture flags ensure that each thread and its CONTEXT structure will be captured in this snapshot. Once the snapshot is created, each thread in the snapshot is iterated over, with a pair of the thread ID and CONTEXT structure being saved into a vector. Once the iteration completes, the vector will contain all threads and their contexts and is returned to the caller.

Now that all thread contexts are available, you can choose which thread to hijack to run the injection code. Ideally, this should be an active thread, so that your DLL injection happens immediately. If you choose a thread that is waiting on some condition, the DLL injection may happen at a much later time, if it even happens at all. The main thread of the process is a good choice to use. As mentioned earlier, the instruction pointer (RIP) will be changed in this thread. But before changing the instruction pointer, the assembly stub to hijack the thread needs to be generated.

Generating the hijack stub

The assembly stub needs five pieces of information: the address of the temporary stack pointer that will be used, the address of the LoadLibraryA function, the absolute path of the DLL to inject, and the addresses of the old instruction pointer and stack pointer to restore the thread’s original execution state. The listing below shows the stub generation function.

auto GenerateHijackStub(
    const void* const remoteStackFrameAddress,
    const void* const remoteLoadLibraryAddress,
    const std::string& fullModulePath,
    const DWORD_PTR originalRipAddress,
    const DWORD_PTR originalStackPointer) {

    std::array<unsigned char, 22> hijackStubPrologue{
        /* mov rsp, [remote stack pointer address] */
        0x48, 0xBC, 0xCC, 0xCC, 0xCC, 0xCC, 0xCC, 0xCC, 0xCC, 0xCC,

        /* push rax */
        0x50,

        /* push rcx */
        0x51,

        /* push rdx */
        0x52,

        /* push r8*/
        0x41, 0x50,

        /* push r9 */
        0x41, 0x51,

        /* push r10 */
        0x41, 0x52,

        /* push r11 */
        0x41, 0x53,

        /* pushfq */
        0x9C
    };

    std::array<unsigned char, 27> hijackStubLoadLibrary{
        /* lea rcx, [rip + module path offset] */
        0x48, 0x8D, 0x0D, 0xCC, 0xCC, 0xCC, 0xCC,

        /* mov rdx, LoadLibraryA address*/
        0x48, 0xBA, 0xCC, 0xCC, 0xCC, 0xCC, 0xCC, 0xCC, 0xCC, 0xCC,
        
        /* sub rsp, 0x40 */
        0x48, 0x83, 0xEC, 0x40,

        /* call rdx */
        0xFF, 0xD2,

        /* add rsp, 0x40 */
        0x48, 0x83, 0xC4, 0x40
    };

    std::array<unsigned char, 36 + MAX_PATH + 1> hijackStubEpilogue{

        /* popfq */
        0x9D,

        /* pop r11 */
        0x41, 0x5B,

        /* pop r10 */
        0x41, 0x5A,

        /* pop r9 */
        0x41, 0x59,

        /* pop r8 */
        0x41, 0x58,

        /* pop rdx */
        0x5A,

        /* pop rcx */
        0x59,

        /* pop rax */
        0x58,

        /* mov rsp, [original stack pointer address] */
        0x48, 0xBC, 0xCC, 0xCC, 0xCC, 0xCC, 0xCC, 0xCC, 0xCC, 0xCC,

        /* push low word of original address*/
        0x68, 0xCC, 0xCC, 0xCC, 0xCC,

        /* mov [rsp+4], high word of original address*/
        0xC7, 0x44, 0x24, 0x04, 0xCC, 0xCC, 0xCC, 0xCC,

        /* ret */
        0xC3,

        /* null-terminated space for module path */
        0x00
    };

    const auto stackFrameAddress{ reinterpret_cast<DWORD_PTR>(
        remoteStackFrameAddress) + 0x40000 };
    std::memcpy(&hijackStubPrologue[2], &stackFrameAddress, sizeof(DWORD_PTR));

    const auto loadLibraryAddress{ reinterpret_cast<DWORD_PTR>(
        remoteLoadLibraryAddress) };
    const auto offsetToModuleName{ 56 };
    const auto lowAddress{ static_cast<DWORD>(
        originalRipAddress) & 0xFFFFFFFF };
    const auto highAddress{ static_cast<DWORD>(
        (originalRipAddress >> 32)) & 0xFFFFFFFF };

    std::memcpy(&hijackStubLoadLibrary[3], &offsetToModuleName, sizeof(DWORD));
    std::memcpy(&hijackStubLoadLibrary[9], &loadLibraryAddress, sizeof(DWORD_PTR));

    std::memcpy(&hijackStubEpilogue[14], &originalStackPointer, sizeof(DWORD_PTR));
    std::memcpy(&hijackStubEpilogue[23], &lowAddress, sizeof(DWORD));
    std::memcpy(&hijackStubEpilogue[31], &highAddress, sizeof(DWORD));
    std::memcpy(&hijackStubEpilogue[36], fullModulePath.c_str(), 
        fullModulePath.length());

    return concatenate(hijackStubPrologue, hijackStubLoadLibrary, 
        hijackStubEpilogue);
}

The assembly stub generator function.

The stub is split into three parts: a prologue that sets the new stack pointer and saves the volatile registers* and flags, the core logic that performs the LoadLibraryA call, and an epilogue that restores the volatile registers and flags, sets the stack pointer to its original value, and then passes control back to the original instruction pointer.

* For brevity, only the volatile general-purpose registers are saved. A full implementation should also save the volatile floating-point registers.

You may notice that the new stack pointer is written in with an offset from its base address. This is done to give the LoadLibraryA a buffer area on the stack where it, and other internal functions that it calls, can build their stack frames. The stack pointer is also decremented prior to the LoadLibraryA call, and then incremented back to its original value afterwards. This is done to prevent the LoadLibraryA call from clobbering the saved general-purpose register values that are currently on the stack. The 0x40 offset that is used is large enough from the area on the stack where the general-purpose registers are stored that the LoadLibraryA will not overwrite them when it uses the stack to carry out its logic.

At the end of the stub, control is handed back to the original instruction pointer in a bit of an unintuitive way. The thread context needs to be the same when control is handed back, but there is no way to jump to an absolute 64-bit address without using a register. The alternative to this is to push the address on the top of the stack and execute the ret instruction. When the ret instruction executes, it will pop the value at the top of the stack and set the instruction pointer (RIP) to it. However, this approach also has a problem: x64 assembly has no way to push an immediate 64-bit value onto the stack. Fortunately, this limitation can be overcome by pushing the absolute address onto the stack in two parts: first the 32-bit low word of the address, and then by writing in the remaining high word into [Rsp+0x4], which corresponds to the top 32-bits. Now, once the ret instruction is executed, the absolute address will be popped off the top of the stack and put into the instruction pointer.

Setting the target thread’s context

With the assembly stub generated, the last part is to set the target thread’s context to point to the address of the stub.

void SetRemoteThreadContext(const DWORD threadId, const void* const newRip,
    CONTEXT& context) {

    auto threadHandle{ OpenThread(THREAD_SET_CONTEXT,
        false, threadId) };
    if (threadHandle == nullptr) {
        PrintErrorAndExit("OpenThread");
    }

    context.Rip = reinterpret_cast<DWORD_PTR>(newRip);

    auto result{ SetThreadContext(threadHandle, &context) };
    if (!result) {
        PrintErrorAndExit("SetThreadContext");
    }

    CloseHandle(threadHandle);
}

Setting a threads context to resume execution at a different instruction pointer.

To change a thread’s context, a handle to the thread must be open with the THREAD_SET_CONTEXT access right. Once this handle is obtained, changing the context is just a matter of calling the SetThreadContext function with the new context. For the context hijacking purposes, the Rip field is changed to point to the address of the assembly stub. With this last bit of functionality defined, the loader can be written.

void InjectWithHijackedThreadContext(const DWORD processId, std::string& 
    fullModulePath) {

    const auto processHandle{ GetTargetProcessHandle(processId) };

    const auto NtSuspendProcess{
        GetNativeFunctionPtr<NtSuspendProcessPtr>("NtSuspendProcess") };
    NtSuspendProcess(processHandle);

    const auto threadContexts{
        GetTargetProcessThreadContexts(processHandle) };

    auto hijackThread{ threadContexts[0] };

    const auto* remoteLoadLibraryAddress{ GetRemoteModuleFunctionAddress(
        "kernel32.dll", "LoadLibraryA", 
        processId)};
    const auto* remoteFullModulePathAddress{ WriteBytesToTargetProcess<char>(
        processHandle, fullModulePath) };

    std::array<unsigned char, 1024 * 512> remoteStackFrame{ 0xCC };
    const auto* remoteStackFrameAddress{ WriteBytesToTargetProcess<unsigned char>(
        processHandle, remoteStackFrame) };

    auto hijackStub{ GenerateHijackStub(
        remoteStackFrameAddress, remoteLoadLibraryAddress, fullModulePath,
        hijackThread.second.Rip, hijackThread.second.Rsp) };

    const auto* remoteHijackStub{ WriteBytesToTargetProcess<unsigned char>(
        processHandle, hijackStub, true) };

    SetRemoteThreadContext(hijackThread.first, remoteHijackStub, 
        hijackThread.second);

    const auto NtResumeProcess{
        GetNativeFunctionPtr<NtResumeProcessPtr>("NtResumeProcess") };
    NtResumeProcess(processHandle);
}

int main(int argc, char* argv[]) {

    auto fullModulePath{ GetInjectedDllPath("Ch10_GenericDll.dll") };

    const auto processId{ GetTargetProcessAndThreadId(
        "Untitled - Notepad").first };

    InjectWithHijackedThreadContext(processId, fullModulePath);

    return 0;
}

The full implementation of the loader.

The loader begins by opening a handle to the target process. Once the handle is obtained, the entire process is suspended by calling NtSuspendProcess. After the process is suspended, all thread contexts are retrieved and the first thread’s context is chosen to be modified. The assembly stub generation then begins setting up the required parameters by retrieving the address of LoadLibraryA, and allocating a block of memory in the target processes address space that will serve as the temporary stack. These two parameters, along with the full module path, original instruction pointer, and original stack pointer, are used to generate the assembly stub. Once the stub is generated by the loader, it is written into the target processes address space. Lastly, the target thread’s context is changed to point to the address where the assembly stub was written in, and NtResumeProcess is called to resume execution.

Running the demo

Note: If you are using the new UWP Notepad that is in the latest Windows version, you will need to downgrade to the classic version for the demo to work.

The ContextHijacking project provides the full implementation that was presented in this section. To test this locally, build both the GenericDll project and the ContextHijacking loader project. After a successful build, launch Notepad and then the loader application. You will see the familiar “DLL Injected!” message box pop up. Do not dismiss this message box yet. Instead, open up Process Hacker, find the notepad.exe process, and navigate to its Threads tab. Unlike the previous section example, where a new thread was created by a CreateRemoteThreadEx call, there is no new thread created.

The Threads tab of notepad.exe

However, looking in the Modules tab will reveal that GenericDll.dll was loaded, as shown below.

The GenericDll.dll DLL has been injected into notepad.exe.

This shows that the GenericDll.dll DLL was injected into notepad.exe and the message box is executing in the context of the Notepad process.

If you are curious to see the execution of the context hijack stub, then you can trace through it with a debugger, though the steps are a bit more involved. Relaunch the Notepad application and attach to it with x64dbg by opening up x64dbg and navigating to File -> Attach from the menu bar. In the Attach dialog, enter in notepad.exe and select the Notepad process.

The Notepad process is available to attach to in x64dbg.

Make sure that x64dbg is not in a broken state and that the Notepad process is running. In Visual Studio, set a breakpoint on the NtResumeProcess call and launch the loader. When your breakpoint in Visual Studio is hit, the Notepad process will still be in a suspended state and you will have a chance to trace through the context hijack stub. Hover your cursor over the targetHijackStub variable and copy its address, as shown below.

Copying the address of targetHijackStub.

Navigate back to x64dbg. Click in the main window showing the disassembled instructions, and press Ctrl + G to bring up the “Follow Expression” dialog.

Choosing an expression to follow.

Enter in the address of targetHijackStub in this dialog, and press Enter. This will take you to the place in memory where the context hijacking stub was allocated and written. You should see the instructions for the hijack stub. Click on the first instruction and press F2 to set a breakpoint. The address will be highlighted in red once the breakpoint is set.

The context hijack stub in the notepad.exe process.

Navigate back to Visual Studio and continue the execution of the loader. This will complete the NtResumeProcess call and the Notepad application will once again continue to run. Once the loader has finished execution, navigate back to x64dbg. The breakpoint that you set at the start of the context hijack stub should be hit. This will be denoted by the color of the instruction changing, as shown below:

The breakpoint at the start of the stub being hit.

At this point, you can continue to step through the instructions in x64dbg. When the call rdx instruction in the stub is executed, the GenericDll.dll DLL will be loaded and you will see the “DLL Injected!” message box pop up.

DLL Injection: Remote Threads (3/5)

Filed under: Programming,Reverse Engineering — admin @ 7:43 PM

Table of Contents:

Another common technique to perform DLL injection is to use the CreateRemoteThreadEx function. As its name suggests, this function creates a thread that begins execution in the address space of another process. The CreateRemoteThreadEx function has the following prototype:

HANDLE WINAPI CreateRemoteThreadEx(HANDLE hProcess,
    LPSECURITY_ATTRIBUTES lpThreadAttributes,
    SIZE_T dwStackSize,
    LPTHREAD_START_ROUTINE lpStartAddress,
    LPVOID lpParameter,
    DWORD dwCreationFlags,
    LPPROC_THREAD_ATTRIBUTE_LIST lpAttributeList,
    LPDWORD lpThreadId);

This function looks daunting at first, but most of the parameters are optional. For the purposes of DLL injection, where you only just care about getting the thread created and started – and not worrying about things like the thread’s various customizations – these optional parameters will not be used. The only parameters that are important here are the process handle (hProcess), thread start address (lpStartAddress), and the parameter for the start address (lpParameter).

Using CreateRemoteThreadEx to perform DLL injection becomes intuitive once you see that you can start this thread at any address, and with a parameter of your choice. Given control over these two parameters, what would happen if you set the thread start address to the address of the LoadLibraryA function, and passed in a pointer to the library path as the parameter? Your remote thread would be performing a LoadLibraryA call — which would load your DLL — in your target processes address space.

Getting the target process handle

Having understood how the DLL injection will work, it is time to get started on the implementation. There are three things needed: the handle to the target process, the address of the LoadLibraryA function, and a pointer in the target process to a string with the DLL path. Obtaining the process handle is done with the OpenProcess call.

HANDLE GetTargetProcessHandle(const DWORD processId) {

    const auto processHandle{ OpenProcess(
        PROCESS_CREATE_THREAD | PROCESS_VM_OPERATION | PROCESS_VM_WRITE,
        false, processId) };
    if (processHandle == nullptr) {
        PrintErrorAndExit("OpenProcess");
    }

    return processHandle;
}

Opening a process handle to the target process.

The handle will need the PROCESS_CREATE_THREAD, PROCESS_VM_OPERATION, and PROCESS_VM_WRITE access rights. The first permission is needed for CreateRemoteThreadEx to create the remote thread. The latter two permissions are needed to write in the path to the DLL into the target processes address space.

Getting the address of LoadLibraryA

Having obtained a handle to the process, the next step is to find the address of the LoadLibraryA function. This function is found in kernel32.dll, which is a system DLL that on Windows has the same load address in all processes. This means that you can get the address of LoadLibraryA in your process, and trust that it will be the same address in the target process. The implementation for this is shown below:

void* GetLoadLibraryAddress() {

    return GetProcAddress(GetModuleHandleA(
        "kernel32.dll"), "LoadLibraryA");
}

Obtaining the address of the LoadLibraryA function.

It suffices to use the address returned from this function as the thread start address in CreateRemoteThreadEx. However, I would like to also present an implementation that is a bit more generic and will work to retrieve the address of a function in any DLL without requiring a DLL to be loaded at the same address in every process.

void* GetRemoteModuleFunctionAddress(const std::string moduleName,
    const std::string functionName, const DWORD processId) {

    void* localModuleBaseAddress{ GetModuleHandleA(moduleName.c_str()) };
    if (localModuleBaseAddress == nullptr) {
        localModuleBaseAddress = LoadLibraryA(moduleName.c_str());
        if (localModuleBaseAddress == nullptr) {
            PrintErrorAndExit("LoadLibraryA");
        }
    }

    const void* const localFunctionAddress{
        GetProcAddress(static_cast<HMODULE>(localModuleBaseAddress), 
            functionName.c_str()) };

    if (localFunctionAddress == nullptr) {
        PrintErrorAndExit("GetProcAddress");
    }

    const auto functionOffset{ PointerToRva(
        localFunctionAddress, localModuleBaseAddress) };

    const auto snapshotHandle{ CreateToolhelp32Snapshot(
        TH32CS_SNAPMODULE, processId) };
    if (snapshotHandle == INVALID_HANDLE_VALUE) {
        PrintErrorAndExit("CreateToolhelp32Snapshot");
    }

    MODULEENTRY32 module {
        .dwSize = sizeof(MODULEENTRY32)
    };

    if (!Module32First(snapshotHandle, &module)) {
        PrintErrorAndExit("Module32First");
    }

    do {
        auto currentModuleName{ std::string{module.szModule} };

        std::transform(currentModuleName.begin(), currentModuleName.end(), 
            currentModuleName.begin(),
            [](unsigned char letter) { return std::tolower(letter); });
        if (currentModuleName == moduleName) {
            return reinterpret_cast<void*>(module.modBaseAddr + functionOffset);
        }

    } while (Module32Next(snapshotHandle, &module));

    return nullptr;
}

An implementation that can get the address of an exported function from any DLL.

This function works by first getting the base address of the DLL in your process; either obtaining it with GetModuleHandleA if the DLL is already loaded, or explicitly loading the DLL with LoadLibraryA. After obtaining the base address, the pointer to the target function is found, and the offset between the DLL base address and the function address is calculated. While the base addresses of DLLs may differ across processes, the offset between the base address and the address of the target function will be the same.

Once the offset is known, the next step is to find the DLL base address in the target process. This is accomplished by using CreateToolhelp32Snapshot to create a snapshot of the target processes loaded modules. The loaded modules can then be iterated over with the Module32First and Module32Next functions. These calls populate a MODULEENTRY32 structure with information about the current module, including a modBaseAddr field that indicates the DLL’s base address in the target process. While iterating, if the current module matches the module that you are looking for, return the module’s base address plus the target function offset. This will be the absolute address in the target processes virtual address space of your target function.

Writing the injected DLL path

With a process handle, and now the address of the LoadLibraryA function, there is one last value that needs to be obtained: a pointer to the path of the DLL that will be injected. The target process will not know anything about your DLL, so you will definitely not find a pointer to its path anywhere in the target processes address space. That means that you need to write in the path to your DLL. Fortunately, the combination of the VirtualAllocEx and WriteProcessMemory functions can accomplish this task.

template <typename T>
void* WriteBytesToTargetProcess(const HANDLE processHandle,
    const std::span<T> bytes, bool makeExecutable = false) {

    static_assert(sizeof(T) == sizeof(uint8_t), "Only bytes can be written.");

    const auto remoteBytesAddress{ VirtualAllocEx(processHandle, nullptr,
    bytes.size(), MEM_RESERVE | MEM_COMMIT,
        makeExecutable ? PAGE_EXECUTE_READWRITE : PAGE_READWRITE) };
    if (remoteBytesAddress == nullptr) {
        PrintErrorAndExit("VirtualAllocEx");
    }

    size_t bytesWritten{};
    const auto result{ WriteProcessMemory(processHandle, remoteBytesAddress,
        bytes.data(), bytes.size(), &bytesWritten) };
    if (result == 0) {
        PrintErrorAndExit("WriteProcessMemory");
    }

    return remoteBytesAddress;
}

Writing in a span of bytes to a process.

The VirtualAllocEx function is used to allocate a block of memory in the target process. The value returned from VirtualAllocEx will contain a pointer in the target processes address space of where the memory was allocated. This pointer can then be passed to WriteProcessMemory to write in a span of bytes, which will be the file path that the DLL to be injected is found at.

The file path can be passed in as a hardcoded value, or, as a more flexible option, can be retrieved at runtime.

std::string GetInjectedDllPath(const std::string& moduleName) {

    char imageName[MAX_PATH]{};
    DWORD bytesWritten{ MAX_PATH };
    auto result{ QueryFullProcessImageNameA(GetCurrentProcess(),
        0, imageName, &bytesWritten) };
    if (result == 0) {
        PrintErrorAndExit("QueryFullProcessImageNameA");
    }

    std::string currentDirectoryPath{ imageName, bytesWritten };
    const auto fullModulePath{ currentDirectoryPath.substr(
        0, currentDirectoryPath.find_last_of('\\') + 1)
        + moduleName };

    return fullModulePath;
}

Obtaining the absolute path of the DLL that will be injected.

The GetInjectedDllPath function obtains the absolute path of the current process, which will be loading the DLL. The process name is removed from this path, and the DLL name is put in its place. This function assumes that the loader process and the DLL that is being injected are in the same directory, but that limitation still provides more flexibility over a hardcoded path.

Creating the remote thread

The CreateRemoteThreadEx function can finally be called since the parameters for it have all been retrieved.

void InjectWithRemoteThread(const DWORD processId, std::string& fullModulePath) {

    const auto processHandle{ GetTargetProcessHandle(processId) };

    const auto remoteStringAddress{ WriteBytesToTargetProcess<char>(
        processHandle, fullModulePath) };

    const auto* const loadLibraryAddress{ GetRemoteModuleFunctionAddress(
        "kernel32.dll", "LoadLibraryA", processId) };

    const auto threadHandle{ CreateRemoteThreadEx(processHandle, nullptr, 0,
        reinterpret_cast<LPTHREAD_START_ROUTINE>(loadLibraryAddress),
        remoteStringAddress, 0, nullptr, nullptr) };
    if (threadHandle == nullptr) {
        PrintErrorAndExit("CreateRemoteThread");
    }

    CloseHandle(processHandle);
}

int main(int argc, char* argv[]) {

    auto fullModulePath{ GetInjectedDllPath("Ch10_GenericDll.dll") };

    const auto processId{ GetTargetProcessAndThreadId(
        "Untitled - Notepad").first };

    InjectWithRemoteThread(processId, fullModulePath);

    return 0;
}

A loader that injects a DLL with CreateRemoteThreadEx.

The loader begins by opening a handle to the target process. Next, the full path to the DLL that is to be injected is written into the target process. Finally, the address of the LoadLibraryA function is found. CreateRemoteThreadEx is then called, where it is told to create a new thread in the target process that begins its execution at LoadLibraryA and has the address of the full path to the DLL as its argument.

Running the demo

Note: If you are using the new UWP Notepad that is in the latest Windows version, you will need to downgrade to the classic versionfor the demo to work.

The CreateRemoteThread project provides the full implementation that was presented in this section. To test this locally, build both the GenericDll project and the CreateRemoteThread loader project. After a successful build, launch Notepad and then the loader application. You should observe a message box popping up that says “DLL Injected!”, as shown below. Do not dismiss this message box yet.

The message box appearing after the loader injects GenericDll.dll.

To see GenericDll.dll in the notepad.exe address space, open up Process Hacker, find the notepad.exe process, and navigate to the Modules tab. Verify that GenericDll.dll has been loaded; this should be self evident though if the message box has come up. Next, click on the Threads tab. There will be a thread whose start address is listed as kernel32.dll!LoadLibraryA.

The Threads tab of the notepad.exe process.

This is the thread that was created by the CreateRemoteThreadEx call. If you dismiss the message box, you will see this thread exit. The presence of GenericDll.dll in the notepad.exe address space, and a new thread executing at LoadLibraryA show that the DLL was successfully injected and that the message box is executing in the context of the Notepad process.
DLL Injection: Windows Hooks (2/5)

Filed under: Programming,Reverse Engineering — admin @ 7:43 PM

Table of Contents:

One of the most straightforward ways to perform DLL injection is with the use of the SetWindowsHookEx API. Hooks, in Windows terminology, are mechanisms that allow applications to intercept particular system events. Installing a hook is a two-part process. First, you must define and implement a hook procedure* for the hook type that you will be installing. This procedure must be in a DLL**, since the DLL will be injected into the target process(es). Next, you call the SetWindowsHookEx API to install the hook on a specific thread, or on all threads.

* The term “hook procedure” will be used throughout this section. A procedure is just another name for a function, but I will use the term “hook procedure” specifically when referring to the function that will handle hook events.

** Technically, if you are installing a global hook, or a hook procedure on a thread in your own process, it does not need to be in a DLL. This will not be the case for any examples presented in this series since we are interested in injecting DLLs into other processes.

HHOOK WINAPI SetWindowsHookEx(int idHook, HOOKPROC lpfn, HINSTANCE hmod, DWORD dwThreadId);

The first parameter corresponds to the type of hook that will be installed. There are many different types of hooks for system events; there are hooks to monitor messages being sent to window procedures, message queue hooks, keyboard hooks, mouse hooks, and more. These have predefined values such as WH_CALLWNDPROC, WH_GETMESSAGE, WH_KEYBOARD, and so on. Each hook type will have a corresponding hook procedure function associated with it. This is the function that will be invoked when the hook captures a system event. For example, a hook procedure for keyboard hooks (WH_KEYBOARD) must be implemented with the following prototype:

LRESULT CALLBACK KeyboardProc(int code, WPARAM wParam, LPARAM lParam);

The second and third parameters to SetWindowsHookEx are a pointer to the hook procedure, and the base address of the DLL that contains the hook procedure. At runtime, these can be obtained by loading the library with LoadLibraryA and calling GetProcAddress on the hook procedure. Since the pointer to the hook procedure is retrieved with GetProcAddress, the hook procedure must be explicitly exported from the DLL so that it can be found. The final parameter to SetWindowsHookEx is the thread ID that will be associated with the hook. The DLL containing the hook procedure will be injected into the process that owns this thread. The SetWindowsHookEx API allows you to hook all running threads if you pass in a value of zero (0) for this parameter.

Keyboard hooks

For the example, we will use a keyboard hook (WH_KEYBOARD). Let’s start with creating the DLL that will be injected. The code for the DLL is shown below:

extern "C" {

__declspec(dllexport) LRESULT CALLBACK KeyboardProc(
    int nCode, WPARAM wParam, LPARAM lParam) {

    if (nCode != HC_ACTION) {
        return CallNextHookEx(nullptr, nCode, wParam, lParam);
    }

    // Key is up
    if ((lParam & 0x80000000) || (lParam & 0x40000000)) {
        MessageBoxA(nullptr, "Hello World!",
            nullptr, 0);
    }

    return CallNextHookEx(nullptr, nCode, wParam, lParam);
}

}

BOOL WINAPI DllMain(HINSTANCE hinstDLL, DWORD fdwReason,
    LPVOID lpvReserved) {

    return TRUE;
}

The code for the DLL that will be injected.

Since a keyboard hook is being installed, there needs to be a hook procedure that will handle the appropriate events. The KeyboardProc hook procedure does just that; it is the function that will be called when there is a keyboard event to be processed. The KeyboardProc function is exported via the __declspec(dllexport) keyword making it accessible for importing by other applications. You may notice that the KeyboardProc function is also inside of an extern “C” block. This forces the compiler to perform C linkage for functions inside the block, which effectively prevents the compiler from performing any name mangling to the exported function name. If your exported function is outside of this block, then it likely will not be found when you call GetProcAddress to get a pointer to it, due to name mangling.

The KeyboardProc function will display a “Hello World!” message box to the screen in the event of a key press. The function starts by checking whether the status indicates that there is information about the keystroke message. If not, then CallNextHookEx is called to pass the message down the hook chain. If there is keystroke information present, then the function checks whether the message indicates that the key is in an up or released position. If so, then the message box is displayed.

Getting the target thread id

After building the DLL, you can move on to creating the loader for it. The loader logic is pretty straightforward. As described earlier, setting a windows hook involves obtaining the relevant pointers and calling SetWindowsHookEx to perform the installation.

std::pair<DWORD, DWORD> GetTargetProcessAndThreadId(const std::string& windowTitle) {

    DWORD processId{};
    const auto threadId{ GetWindowThreadProcessId(
        FindWindowA(nullptr, windowTitle.c_str()),
        &processId) };
    if (threadId == 0 || processId == 0) {
        PrintErrorAndExit("GetWindowThreadProcessId");
    }

    return std::make_pair(processId, threadId);
}

int main(int argc, char* argv[]) {

    const auto injectingLibrary{ LoadLibraryA("SetWindowsHookExDll.dll") };
    if (injectingLibrary == nullptr) {
        PrintErrorAndExit("LoadLibraryA");
    }

    const auto hookFunctionAddress{ reinterpret_cast<HOOKPROC>(
        GetProcAddress(injectingLibrary, "KeyboardProc")) };

    if (hookFunctionAddress == nullptr) {
        std::cerr << "Could not find hook function" << std::endl;
        return -1;
    }
    
    const auto threadId{ GetTargetProcessAndThreadId(
        "Untitled - Notepad").second };

    const auto hook{ SetWindowsHookEx(WH_KEYBOARD,
        hookFunctionAddress, injectingLibrary, threadId) };
    if (hook == nullptr) {
        PrintErrorAndExit("SetWindowsHookEx");
    }

    std::cout << "Hook installed. Press enter to remove hook and exit."
        << std::endl;

    std::cin.get();

    UnhookWindowsHookEx(hook);

    return 0;
}

A program that injects a DLL named SetWindowsHookExDll.dll into a process.

The loader above starts out by loading SetWindowsHookExDll.dll into memory with a call to LoadLibraryA. After loading the library, a pointer to an export named KeyboardProc is obtained by calling GetProcAddress. The loader continues on to get the thread ID of another process – Notepad in this case. The thread ID is obtained by searching for a window with the caption “Untitled – Notepad”, which is the default caption when you first open the application. Once the thread ID is obtained, the hook can be installed. The SetWindowsHookEx function is called, passing in WH_KEYBOARD to indicate that the hook type will be a keyboard hook, along with the pointer to the hook procedure, the base address of SetWindowsHookExDll.dll, and Notepad’s thread ID.

Running the demo

Note: If you are using the new UWP Notepad that is in the latest Windows version, you will need to downgrade to the classic version for the demo to work.

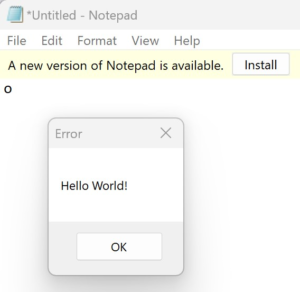
The SetWindowsHookExDll and SetWindowsHookExLoader projects provide the full implementation that was presented in this section. To test this locally, build both the DLL and the loader projects. After a successful build, launch Notepad and then the loader application. Switch to the Notepad window and press any key in the Notepad text box. Upon doing this, you should see a “Hello World!” message box pop up from inside the Notepad process.

The message box appearing after a key press.

If you minimize the Notepad window and type elsewhere, you will not see a message box. This shows that the hook was successfully installed on the target process; meaning that the DLL that you wrote was injected into the process and that your hook procedure was invoked in the context of the target processes address space. You can verify this by opening up Process Hacker, finding the notepad.exe process, and navigating to its Modules tab.

The SetWindowsHookExDll.dll DLL has been loaded into notepad.exe.

When you are finished, go back to the loader and press the Enter key to exit. Doing this will call UnhookWindowsHookEx to remove your hook from the Notepad process. If you are feeling particularly brave, you can pass in zero (0) as the thread ID parameter to SetWindowsHookEx and observe what happens.

DLL Injection: Background & DLL Proxying (1/5)

Filed under: Programming,Reverse Engineering — admin @ 7:42 PM

Table of Contents:

Dynamic-link libraries (DLLs) are code modules that contain sets of functions that other executables can call. Unlike statically linked libraries, which become part of an executable during the compilation process, DLLs can live on their own outside of the application that uses them. There are two ways to perform linking with DLLs: implicit or explicit. In implicit linking, during the compilation phase, the application links with an import library file provided by the developer of the DLL. When the application is loaded, the Windows loader will identify that there is a dynamically linked reference and load the DLL into the application’s address space. On the other hand, explicit linking involves the application loading the DLL manually with the use of the LoadLibrary function, and resolving pointers to functions that it would like to call by calling GetProcAddress.

For the purpose of these demonstrating DLL injection, only explicit linking will be used. DLLs serve as a great entry point into understanding how a process behaves since the DLL will get loaded into the processes address space. The best way to perform complex process manipulation, i.e. hooking functions, modifying memory state, changing control flow, etc., is to write a DLL with your functionality and inject it into the target process. This series of posts will cover the various techniques by which this can be accomplished.

Before you can inject a DLL, you will need to create one. Like the main function of a console application, DLLs have their own entry point called DllMain.

// hinstDLL will contain the address that the
// DLL was loaded at.
BOOL WINAPI DllMain(HINSTANCE hinstDLL, DWORD fdwReason,
    LPVOID lpvReserved) {

    switch (fdwReason) {

    // DLL is being mapped into another processes address space.
    case DLL_PROCESS_ATTACH:
        break;

    // A thread in the process is being created
    case DLL_THREAD_ATTACH:
        break;

    // A thread in the process is terminating
    case DLL_THREAD_DETACH:
        break;

    // DLL is being unmapped from the process address space.
    case DLL_PROCESS_DETACH:
        break;
    }

    return TRUE;
}

A DllMain function that does not do anything.

This function is initially called when your DLL is loaded, but it may also be called again various times afterwards. When DllMain is called, the second parameter that is passed to it will contain a reason code that indicates what condition is causing the call. The reason code will be one of four possible values, whose purpose is described in the code above. The primary reason for these different calls is to allow developers to perform any per-process or per-thread initialization and clean up logic. As a developer, you do not need to handle all four possible states; write code just for the cases that you are interested in*.

* You actually do not need to define a DllMain function at all if your DLL is a resource-only DLL. However, that will not be the case for any examples presented in this series.

Windows processes have address spaces that are isolated from each other. While you can break this isolation and affect change in another processes address space with the help of functions like QueryVirtualMemoryInformation, VirtualAllocEx, ReadProcessMemory, WriteProcessMemory, and similar, it would be very tedious and error-prone to write an application that externally changes a lot of memory state in another process – especially if that second process isn’t expecting it. That is where DLL injection comes in; this technique allows you to execute functions that you have written in a DLL in another processes address space. There are many ways to perform DLL injection, which the rest of this series will cover. Unless explicitly stated, the DLL that is being injected will have the same code as the code shown above, but with one minor modification: it will display a message box on DLL_PROCESS_ATTACH.

// DLL is being mapped into another processes address space.
case DLL_PROCESS_ATTACH:
    MessageBoxA(nullptr, "DLL Injected!", nullptr, 0);
    break;

Debugging Injected DLLs

If you are writing code, chances are you will need to debug it at some point. This becomes even more true when you are writing code that is going to be injected into another process. Debugging will be even more complex since your code may be interacting with the target process at a very low level, i.e., directly overwriting executable code, modifying in-memory structures, calling internal functions, and the like. If you find that your target process crashes after you have injected your DLL, it can be difficult to pin down where the problem occurred. Fortunately, you can debug your injected DLL with Visual Studio. Before injecting your DLL, attach to the target process with the Visual Studio debugger by selecting Debug -> Attach to process… from the menu bar. After the debugger is attached, you can set breakpoints in your DLL code and then inject it. Once the DLL is injected, Visual Studio will load the symbol information for the DLL and allow you to debug the executing code like normal.

DLL Proxying

The first technique presented does not actually perform DLL injection in the traditional sense. Instead, DLL proxying involves replacing a DLL that your target process loads with your own. For example, if you know that your target process loads GenericDll.dll, you can rename GenericDll.dll to GenericDll2.dll, and put your DLL file as GenericDll.dll in the application path. Then the application will load your DLL, at which point you can do whatever you wish. The only caveat with DLL proxying is that your DLL must export the same functions as the original DLL. The target application is loading the DLL for a reason; it is expected that at some point the application will want to call functions that the DLL provides. If your replacement DLL does not export them then it’s very likely that bad things will happen, i.e., the application crashes. Let’s assume that GenericDll.dll is a very simple DLL with the following source code:

extern "C" {

__declspec(dllexport) void DisplayHelloWorld() {
    MessageBoxA(nullptr, "Hello World!", nullptr, 0);
}

}

BOOL WINAPI DllMain(HINSTANCE hinstDLL, DWORD fdwReason,
    LPVOID lpvReserved) {

    return TRUE;
}

The source code for GenericDll.dll.

Creating the proxy DLL

GenericDll.dll simply exports a function called DisplayHelloWorld. To get your proxy DLL to work, create a DisplayHelloWorld function, load the original DLL in it, use GetProcAddress on the original DisplayHelloWorld to get the function address, and perform the call on behalf of the target process. This will work, but it doesn’t scale well. DLLs can have hundreds of functions, and re-creating them – including their parameters and return types – requires a lot of boilerplate code and is very error prone. The solution to this is to use forwarding functions. When creating a DLL, you can specify a linker directive that will create an export for a function, and forward the actual implementation to another DLL.

#pragma comment(linker, "/export:DisplayHelloWorld=GenericDll2.DisplayHelloWorld")

#include <Windows.h>

BOOL WINAPI DllMain(HINSTANCE hinstDLL, DWORD fdwReason,
    LPVOID lpvReserved) {

    switch (fdwReason) {
    case DLL_PROCESS_ATTACH:
        MessageBoxA(nullptr, "Proxy DLL Loaded!", nullptr, 0);
    }

    return TRUE;
}

The Proxy DLL source code with a function forwarder.

The pragma directive above tells the linker that a function named DisplayHelloWorld will actually be implemented by another function called DisplayHelloWorld in a DLL named GenericDll2.dll. When creating a proxy DLL, you can specify this directive for all of the original DLL’s exports. This will allow your DLL to be loaded, while also keeping the expected functionality for the application that is loading your DLL.

Powered by WordPress