This post will explain how to set up the multi-language compiler system on Ubuntu 20.04. Given that everything is containerized, it hopefully shouldn’t be too bad to set up if you want to try it in action.
Starting with a fresh install, some dependencies are needed:
Once the repository is cloned, the shared mounted folder needs to be created. In the Kubernetes deployment files this local path is /home/${USER}/Desktop/shared, so take the folder called shared from the repo and place it in /home/${USER}/Desktop/.
Read/write/execute permissions should be set on this shared folder as well so that the containers can properly perform their operations on the subdirectories within it. Replace ${USER} with the current user name.
chmod -R 777 /home/${USER}/Desktop/shared
After this is done you can run the build-all-dockerfiles.sh script followed by the deploy-all.sh script. If everything worked you should see a folder with the running container id in the shared folders input, output, etc directories. From here you can follow the previous post giving a demo of the system to try it yourself.
This concludes the series on creating a multi-language compiler system. Just from the length and number of posts, it is clear that a lot goes into creating something like this. Through this series of posts, a full, feature-rich, end-to-end pipeline was developed that can do the following:
Take in an arbitrary input file for a supported language
Compile (if needed) and execute the source code
Provide console arguments to the executable
Provide interactive input to the executable at runtime
Run in multi-threaded mode and support multiple compilations and executions at the same time
Provide a degree of security through isolation of compilation and low-privilege execution in a containerized environment
Provide time limits on how long a compilation and execution process can take
Allow for scaling the number of system pods by language
Isolate language-specific environment setup so that new languages can be added easily
Overall, not too bad for a project that took a couple of weekends. But as always, there are things that are missing or that could be improved. I hope that anyone who took the time to go through these posts has learned something from them and gets a better understanding of how these multi-language compiler systems work.
This post will present a demo of the system in action. It aims to demonstrate how to take an input source file and get the output execution. Basic usage is covered, as well as the more advanced features of command-line input and interactive sessions. The post then wraps up by testing the timeout and autoscaling resiliency features of the system.
Basic input
After launching the system, the shared mount between container(s) and hosts will contain a folder in the various directories corresponding to the containers unique identifier.
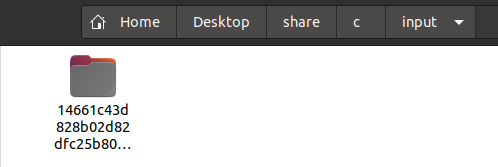
One C compiler instance has been launched. Its folder is shown above.
As shown above, the input directory now contains a folder, 2cd0b1…, which is mapped to the input folder for the running container. If multiple containers are running then multiple uniquely named folders would be present here. This input folder will be the location where C source language files are dropped. For example, take the following short C program,
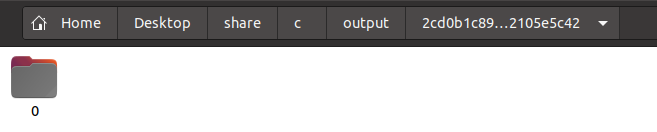
After saving this as a file called test.c, putting it into the 2cd0b1… directory, you will notice that the file seems to disappear. This is because the file watcher has picked up the addition of the new file to the directory and has kicked off the compilation and execution process. Navigating to the output directory, you will see a folder with the same name, 2cd0b1…. Inside of this folder is another folder simply called 0.
Folder 0 is present after adding the input source file.
These are folders that are named sequentially for each input that has ran, i.e. the first input source files output will be placed in folder 0, the second one in folder 1, etc. Navigating inside this 0 folder, there is a file called test.c.log. Opening that file up, you can see the output and return code of the code that has just been compiled:
Introducing a syntax error, i.e. removing a semicolon from test.c and trying again gives different output. After making those changes and adding it to the input directory, there will be now be a folder called 1 to correspond to this next execution of the system. The test.c.log file in that folder has the following output, showing that the compiler output has been captured and that there is an error:
{
    "result": {
        "return": 0,
        "output": "/home/user/code/share/c/workspace/2cd0b1c89028aeb0283a56deb091ce24a626febda22c7eaf79a31dd2105e5c42/1/test.c: In function 'main':\n/home/user/code/share/c/workspace/2cd0b1c89028aeb0283a56deb091ce24a626febda22c7eaf79a31dd2105e5c42/1/test.c:5:46: error: expected ';' before 'fprintf'\n     fprintf(stdout, \"Hello, World! stdout\\n\")\n                                              ^\n                                              ;\n     fprintf(stderr, \"Hello, World! stderr\\n\");\n     ~~~~~~~                                   \n"
    }
}
This same process can be repeated with files of any supported language.
Command-line arguments
It is easy to test command-line arguments by uncommenting the line that prints the value of argv[1] in the test.c program above. For command-line arguments to be properly passed in, they need to be specifies in a dedicated file as well. This file should have the same name as the input, with the .args extension added at the end. So just create a test.c.args file with the value of the command-line argument, i.e. “123”. Take this file and add it to the arguments folder for the container
test.c.args being added to the arguments folder of the container
Next add the test.c input file to the input folder again. You should see the source file disappear and a new folder called 3 (for third execution) be created in the output folder if the system is still up. As before, inside this folder, there is a test.c.log file. That log file now contains the original input plus the command-line argument as part of the output:
Now lets try an interactive session; this time we will use Java. To do this, we need a Java file that reads in command-line input at runtime. That is easy enough to do and the code for it is shown below:
import java.io.BufferedReader;
import java.io.IOException;
import java.io.InputStreamReader;

public class MyTestClass {
  public static void main(String[] args) throws IOException {
    System.out.println("Hello, World! stdout");
    System.err.println("Hello, World! stderr");

    BufferedReader reader = new BufferedReader(
            new InputStreamReader(System.in));

    for(int i = 0; i < 5; i++)
    {
        String name = reader.readLine();
        System.out.println("You entered: " + name);
    }
  }
}
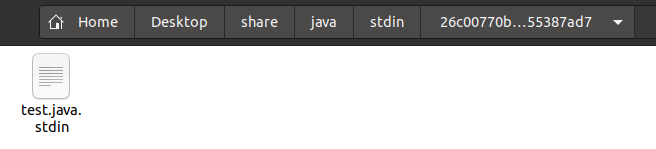
The process for an interactive session is similar to providing a command-line arguments: we need a dedicated file to store the input session state. This time, instead of creating an .args file with command-line input, we will create an empty .stdin file named test.java.stdin. This will be placed in the stdin folder of the container running the Java compiler system.
An empty test.java.stdin file inside the stdin folder of the Java container.
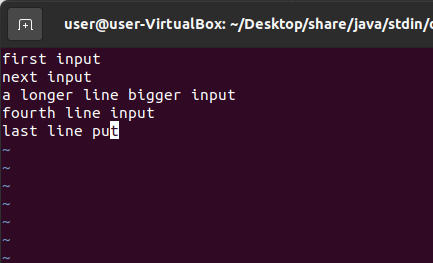
After this file is placed in the stdin folder, the test.java file can be placed into the input folder. After placing the file in the input folder you will notice that it did not disappear. This is because the interactive process is taking place and the source file is not cleaned up until the last step in the compilation and execution process. Now that an interactive session is established, it is time to provide input via the .stdin file. For this it is best to use a text editor such as vim or similar which does not perform any intermediate saves or newline formatting.
Five lines of input for the example run.
Each line of input is forwarded to the stdin of the running Java process. This input was generated by typing a line and saving the test.java.stdin file. After saving the fifth line, the input file disappeared and a test.java.log file was generated in the output directory. This log file shows the input from the .stdin file being properly being forwarded to the running process as if it was entered on the keyboard:
{
    "result": {
        "return": 0,
        "output": "Hello, World! stdout\r\nHello, World! stderr\r\nfirst input\r\nYou entered: first input\r\nnext input\r\nYou entered: next input\r\na longer line bigger input\r\nYou entered: a longer line bigger input\r\nfourth line input\r\nYou entered: fourth line input\r\nlast line put\r\nYou entered: last line put\r\n"
    }
}
Timeouts
Testing timeouts is pretty straightforward. The default timeout value for a non-interactive session is 10 seconds, so we can just test a program with an infinite loop and wait. If everything works correctly then the process should be killed after the maximum timeout value. For variety, we can test this with Python. To do this, we can create a Python input file that does nothing but a print-sleep loop:
import sys
import time

while True:
    print("Hello, World!", file=sys.stdout)
    time.sleep(1)
After adding this to the input folder of the Python container, we can wait for 10 seconds. After this amount of time the input file should disappear and there should be a file present in the output directory. The contents of this file show that the timeout was indeed hit as ten messages were printed:
The last bit of the system to test out is the autoscaling. If we take a test input file, create hundreds of copies of it, and add it to the input directory of a target language container, we can trigger the autoscaling to kick in as CPU and memory resources will begin to be heavily utilized. When new instances come up, they will create a unique folder in the various directories. Under a more resilient system, the input file load from the initial instance would be redistributed across the new instances that scaled in. Shown below is what happened after adding a lot of stress to the single container pod that was up:
Five new instances were scaled in due to the high load on the pod.
Kubernetes will take pods out of service after some time when the CPU and memory utilization stabilizes. After waiting around five minutes on my machine, the underutilized pods were taken out of service and shut down.
One container remains after the rest have been shut down.
This post will cover how to add Kubernetes as an orchestration layer for the Dockerfiles that were created in the previous post. Right now, each language has its own dedicated container environment to run it. However, launching these Dockerfiles is a manual process, and these files do not automatically scale with user input. If we have a C++ compiler system running and provide it with a constant stream of input files, the system will eventually back up if the rate of compilation and execution is greater than the rate of input files being added. It would be nice to automatically launch Docker containers to handle this increased load, and alternatively it would be nice to automatically kill off extra Docker containers that are idle for long periods of time. This is where Kubernetes comes in to the picture.
I won’t go into much detail about Kubernetes; their interactive tutorials cover more ground than I ever could in a blog post. All that I will mention is that it is an exceptionally feature rich and complex platform for automating deployments, scaling, and general orchestration of containers. As part of this multi-language compiler system, the only features that we care about are autoscaling and mounting a partition to the host.
Deployment configuration
The Kubernetes deployments for each language is provided in a deployment.yaml file. This file provides a spec for the containers for CPU and memory limits, as well as volume information for where the shared mount volume. This shared mount volume is needed as an easy way to provide input source files to the running containers, as containers cannot have access to the host filesystem. Exposing mounted volumes to containers can be a security risk and was explicitly chosen to keep the system simple, as opposed to fully secure. A deployment.yaml file is shown below:
This particular file is for the C compiler environment. The container compiler-base-c will be launched under this deployment configuration. This container will have the resources specified under the resources section and have a mounted volume that will be visible as /home/user/code/share on the container. This mounted volume will map to the host at path /home/{{USER}}/Desktop/share where {{USER}} will be replaced by the current username when the deployment script is run. When the container is set to shut down, it will invoke the “sh -c ./shutdown.sh” command to clean up.
The latter half of the deployment.yaml file specifies the autoscaling configurations. These containers will scale based on two resource limmits: CPU and memory. If the CPU utilization averages above 75% then Kubernetes will scale in another container pod. Likewise, if the average memory usage is above 800 MB then the same will happen. The minReplicas and maxReplicas specify the minimum and maximum number of container pods that may be active at any given time. Kubernetes will continue to scale the number of container pods up to a maximum of ten if the memory and/or CPU usage is consistently high. If pods become underutilized then they will be automatically taken out of service and killed until there is one pod remaining.
Deployment script
The script to perform a deployment is shown below. The script will perform a deployment for each supported language. There is some logic to substitute the {{USER}} field in the deployment file, but the rest is a straightforward call to the Kubernetes command-line tool kubectl to do the deployment.
#!/bin/bash

LANGUAGES="c cpp cs java py"

for LANGUAGE in $LANGUAGES; do
    CURRENT_USER=${USER}
    REPLACE_USER=`cat "Deployments/${LANGUAGE}/deployment.yaml" | sed "s/{{USER}}/$CURRENT_USER/g"`
    echo "Deploying containers for ${LANGUAGE}"
    echo "$REPLACE_USER" > Deployments/${LANGUAGE}/deployment.runtime.yaml
    sudo microk8s.kubectl apply -f Deployments/${LANGUAGE}/deployment.runtime.yaml
    echo "Deployed containers for ${LANGUAGE}"
done
This fully covers it for the design and implementation of the multi-language compiler system! As described throughout these posts, the system has support for multiple languages, interactive input, multi-threading, and a scalable production deployment in a containerized environment. The next post will show off a demo of the system in action.
This post will discuss how to containerize the multi-language compiler system. As far as functionality goes, it is not necessarily needed: the system as described up to this point is complete and will function as described. Containerization is just a nice to have since it provides a consistent environment for the compiler system to run it. Additionally, containerizing the system will allow for a more flexible architecture since each language can run in its own container. When combined with orchestration platforms like Kubernetes, the architecture can become even more powerful as these different containers can have replicas and autoscaling.
The system will be containerized via Docker; we will isolate each language into its own Dockerfile. These individual language Dockerfiles will extend a general purpose Dockerfile that will contain features common to all environments. You can think of this as a similar approach to the Bash scripts of the file watcher.
Top-level Dockerfile
This is the base Dockerfile that the various language-specific ones extend. This Dockerfile is responsible for:
Adding packages common to all images
Compiling the file watcher component code
Compiling the execution component code
Settings up the user and execution environments and directories
To provide a degree of isolation and some security, the execution component will run as a different, lower privileged, user than the file watcher. Read/write/execute privileges are lowered as well for the execution environment. This helps a bit from a security standpoint, although it is definitely not foolproof. The top-level Dockerfile is provided below:
FROM n0madic/alpine-gcc:9.2.0

RUN apk add --update --no-cache su-exec inotify-tools build-base busybox-suid sudo

# Setup user
ARG USER=user
ENV HOME=/home/${USER}
ENV EXEC=exec
ENV EXEC_HOME=/home/${EXEC}

ENV CODE_PATH=/home/${USER}/code
ENV EXEC_PATH=/home/${EXEC}/code

RUN mkdir ${HOME}
RUN mkdir ${CODE_PATH}

RUN mkdir ${EXEC_HOME}
RUN mkdir ${EXEC_PATH}

ADD agentshared ${CODE_PATH}

# Build file watcher code
RUN g++ -std=c++17 -o ${CODE_PATH}/agent -I ${CODE_PATH}/builtin/code/agent/thirdparty/cereal/include \
    -I ${CODE_PATH}/builtin/code/agent/thirdparty/thread_pools/include \
    ${CODE_PATH}/builtin/code/agent/src/*.cpp \
    ${CODE_PATH}/builtin/code/agent/src/Agent/Notify/*.cpp \
    -lstdc++fs -pthread

# Build executor code
RUN g++ -std=c++17 -o ${EXEC_PATH}/executor ${CODE_PATH}/builtin/code/executor/src/Source.cpp -lstdc++fs -pthread

RUN mv ${CODE_PATH}/builtin/scripts/startup.sh ${CODE_PATH}
RUN mv ${CODE_PATH}/builtin/scripts/shutdown.sh ${CODE_PATH}
RUN mv ${CODE_PATH}/builtin/config/config.json ${CODE_PATH}
RUN rm -rf ${CODE_PATH}/builtin

RUN adduser -D ${USER} && echo "$USER ALL=(ALL) NOPASSWD: ALL" > /etc/sudoers.d/$USER && chmod 0440 /etc/sudoers.d/$USER
RUN adduser -D exec

RUN sudo passwd -d root
RUN sudo passwd -d ${USER}

RUN echo 'user ALL=(ALL) NOPASSWD: ALL' >> /etc/sudoers

RUN chown -R ${USER}:${USER} ${HOME}
RUN chmod -R 751 ${HOME}

RUN chown -R ${EXEC}:${EXEC} ${EXEC_HOME}
RUN chmod -R 555 ${EXEC_PATH}
The startup.sh and shutdown.sh scripts referenced in the Dockerfile as shell scripts that, as their name suggests, are invoked at startup and shutdown. The startup script is responsible for setting up the appropriate folders when a container is launched. Its content is shown below:
#!/bin/bash

CONTAINER_ID=$(basename $(cat /proc/1/cpuset))

create_folders () {
    mkdir ${CODE_PATH}/share/${LANGUAGE}/input/${CONTAINER_ID}
    mkdir ${CODE_PATH}/share/${LANGUAGE}/output/${CONTAINER_ID}
    mkdir ${CODE_PATH}/share/${LANGUAGE}/workspace/${CONTAINER_ID}
    mkdir ${CODE_PATH}/share/${LANGUAGE}/arguments/${CONTAINER_ID}
    mkdir ${CODE_PATH}/share/${LANGUAGE}/stdin/${CONTAINER_ID}
}

fix_config () {
    sed -i "s|\${CODE_PATH}|${CODE_PATH}|g" ${CODE_PATH}/config.json
    sed -i "s|\${UNIQUE_ID}|${CONTAINER_ID}|g" ${CODE_PATH}/config.json
    sed -i "s|\${LANGUAGE}|${LANGUAGE}|g" ${CODE_PATH}/config.json
    sed -i "s|\${SUPPORTED_LANGUAGES}|\"${SUPPORTED_LANGUAGES}\"|g" ${CODE_PATH}/config.json
    sed -i "s|\${IS_MULTITHREADED}|${IS_MULTITHREADED}|g" ${CODE_PATH}/config.json
}

start_agent () {
    ./agent config.json
}

launch_dotnet () {
    dotnet run
    sudo su-exec exec dotnet run
}

main () {
    launch_dotnet
    create_folders
    fix_config
    start_agent
}

main
Since multiple containers can be launched, each container needs its own isolated container environment. This is handled by the create_folders function. The fix_configs function is responsible for setting up the configuration that the file watcher will use. Once the appropriate folders have been created and the configuration substitutions made, the file watcher can be launched via the start_agent function.
The opposite of this process happens on a container shutdown. The created folders are deleted, any unprocessed input is relocated, and the file watcher is shut down. The code for this is shown below:
The language-specific Dockerfiles are much smaller since they contain only the additional functionality needed for a particular language environment. This language-specific functionality is usually just packages or runtimes that are needed for the compiler/interpreter to run. An example for the Java Dockerfile is shown below:
This Dockerfile extends the base one by installing OpenJDK and setting up the environment variables and path that are needed for Java to be invoked from the command line. Dockerfiles for other languages follow a similar pattern. The script to build these Dockerfiles is provided below. This script builds the Dockerfile for each supported language, tags it as latest, and pushes it to the local Docker repository.
#!/bin/bash

languages="alpine c cpp cs java py"

for language in $languages; do
    echo "Building image for ${language}"
    sudo docker build -t compiler-base-${language} -f Dockerfiles/${language}/Dockerfile .
    echo "Tagging image for ${language}"
    sudo docker tag compiler-base-${language}:latest localhost:32000/compiler-base-${language}:latest
    echo "Pushing image for ${language}"
    sudo docker push localhost:32000/compiler-base-${language}:latest
done
At this point each language has been containerized and has its own defined environment for the compiler system to run it. The next post will cover how these Dockerfiles work in combination with Kubernetes to provide resiliency and scaling.