Table of Contents:
- Inline Hooks (1/7)
- Trampolines & Detours (2/7)
- Hardware Breakpoints (3/7)
- Software Breakpoints (4/7)
- Virtual Table Hooks (5/7)
- Import Address Table Hooks (6/7)
- Export Address Table Hooks (7/7)
The previous post showed a valid technique for installing an inline hook. However, overwriting the original instruction bytes of the target function created a problem: these instructions were lost, leaving no way for the original function to be called. The way to remedy this problem is to create a new dynamically generated function — the trampoline function — that holds the original instructions in another part of the program’s executable memory. At the end of this function, there will be an unconditional jump back to the rest of the original function. Visually, the diagram below describes what will happen:
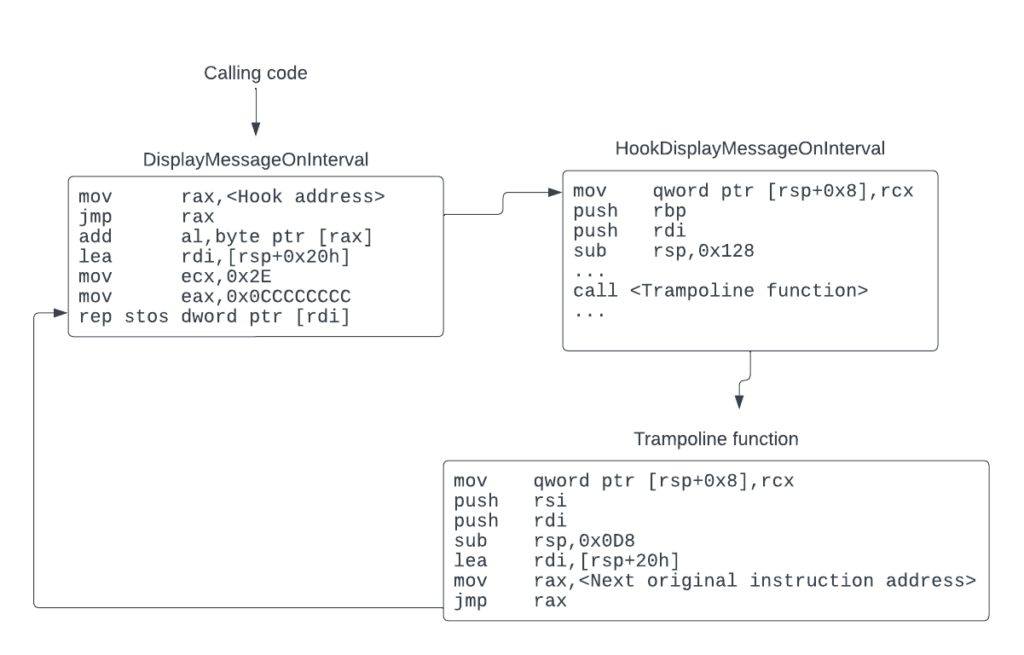
Creating the trampoline
To implement this will require allocating an executable block of memory, copying in the original instructions, and then adding the unconditional jump at the end. You can write a CreateTrampoline function to do this:
void* CreateTrampoline(void* const targetAddress, const size_t size) {

    const auto jumpBack{ CreateJumpBytes(
        reinterpret_cast<unsigned char*>(targetAddress) + size) };

    const auto trampolineStub{ VirtualAlloc(nullptr, size + jumpBack.size(),
        MEM_RESERVE | MEM_COMMIT, PAGE_EXECUTE_READWRITE) };
    if (trampolineStub == nullptr) {
        PrintErrorAndExit("VirtualAlloc");
    }

    std::memcpy(trampolineStub, targetAddress, size);
    std::memcpy(&reinterpret_cast<unsigned char *>(trampolineStub)[size],
        jumpBack.data(), jumpBack.size());

    return trampolineStub;
}
The CreateTrampoline function allocates executable memory for the relocated instructions, copies them in, then adds an unconditional jump back to the original code.
Here you allocate a block of executable memory by calling the VirtualAlloc function with the PAGE_EXECUTE_READWRITE flag. After successfully allocating the memory, it is simply a matter of copying in the instructions with memcpy and appending the unconditional jump at the end. The memory block will have instructions similar to the ones in the table below, though with different runtime and destination addresses.
| Runtime Address | Instruction Bytes | Instruction |
|---|---|---|
| 0x000002C4F37E0000 | 48 89 4C 24 08 | mov qword ptr [rsp+0x8], rcx |
| 0x000002C4F37E0005 | 56 | push rsi |
| 0x000002C4F37E0006 | 57 | push rdi |
| 0x000002C4F37E0007 | 48 81 EC D8 00 00 00 | sub rsp, 0x0D8 |
| 0x000002C4F37E000E | 48 8D 7C 24 20 | lea rdi, [rsp+0x20] |
| 0x000002C4F37E0013 | 48 B8 F3 11 67 09 F6 7F 00 00 | mov rax, 0x7FF6096711F3 |
| 0x000002C4F37E001D | FF E0 | jmp rax |
Installing the hook
Now all that is left is to define the trampoline signature and function pointer, modify the HookDisplayMessageOnInterval function to call the trampoline, and add functionality in the InstallInlineHook function to set the trampoline pointer. This is achieved with the code shown below:
// Trampoline pointer declaration
using HookDisplayMessageOnIntervalTrampolinePtr = void (__stdcall*)(
    const std::string& message);
static HookDisplayMessageOnIntervalTrampolinePtr HookDisplayMessageOnIntervalTrampoline{};

void HookDisplayMessageOnInterval(const std::string& message) {

    std::cout << "HookDisplayMessageOnInterval function called!"
        << std::endl;
    HookDisplayMessageOnIntervalTrampoline("Hooked Hello World");
}

template <typename Trampoline>
void InstallInlineHook(void* const targetAddress, const void* const hookAddress,
    const Trampoline*& trampolineAddress) {

    trampolineAddress = reinterpret_cast<Trampoline*>(
        CreateTrampoline(targetAddress, 19));

    // Rest of code is the same
}
Additional code showing declarations of the trampoline and the modified HookDisplayMessageOnInterval and InstallInlineHook functions.
Calculating overwrite size
You may notice that there is a magic number (19) that is being passed to the CreateTrampoline function. This is the size, in bytes, of the instructions that will be relocated to the trampoline. Since the mov and jmp overwrite size takes up 12 bytes, and entire instructions need to be relocated (just copying 12 bytes will result in a partial copy of an instruction), the size needs to be rounded up to capture the full instruction. This is better illustrated in the table below; count the instruction bytes for the five instructions that are relocated to the trampoline.
| Instruction Bytes | Instruction |
|---|---|
| 48 89 4C 24 08 | mov qword ptr [rsp+0x8], rcx |
| 56 | push rsi |
| 57 | push rdi |
| 48 81 EC D8 00 00 00 | sub rsp, 0x210 |
| 48 8D 7C 24 20 | lea rdi, [rsp+0x20] |
| B9 2E 00 00 00 | mov ecx, 0x2Eh |
| B8 CC CC CC CC | mov eax, 0xCCCCCCCC |
| … | … |
Verifying the hook
At this point, the new version of the inline hook is ready to test. After re-running the code with the new changes, the console output should display “Hooked Hello World” on a five second interval, demonstrating that the hook function was called, modified a parameter, and forwarded the rest of the call to the original DisplayMessageOnInterval function.
This works great for the example program, but unfortunately it is not applicable in every situation. While relocating the instructions that were compiled for this example worked perfectly fine, that is not guaranteed to be the case all of the time. Imagine if you had relocated an instruction that references any sort of relative location, i.e., an instruction that does RIP-relative addressing, or relative branch instructions. When you relocate those types of instructions to another part of memory, the addresses that they were referencing would not match up, likely leading to a crash at runtime at some point in the program’s execution.
The fix for this is not quite so simple; it boils down to needing a disassembler to identify whether the instruction performs any sort operation on a relative address. Fortunately, there is an inline hooking library that takes care of this and provides an easy-to-use API, which will be covered in the second half of this post.
Running the demo
The InlineHookWithTrampoline project provides the full implementation that was presented in this section. As before, you can begin by setting breakpoints on the InstallInlineHook and the line immediately following, as is shown below:
To inspect the generated trampoline, set another breakpoint on the return statement of the CreateTrampoline function.
Launch the application in Visual Studio and verify that your first breakpoint on the InstallInlineHook function was hit immediately. Continue execution so that the next breakpoint gets hit. You should now be in a broken state on the return statement in the CreateTrampoline function. Hover your mouse over the trampolineStub variable. A context menu should pop up showing the variable name and address. Right click the address and select “Copy” from the menu.
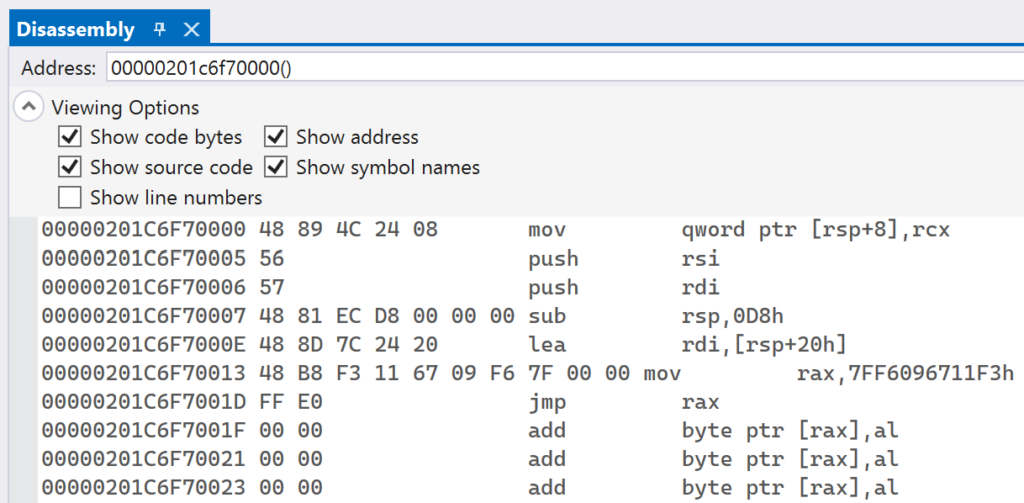
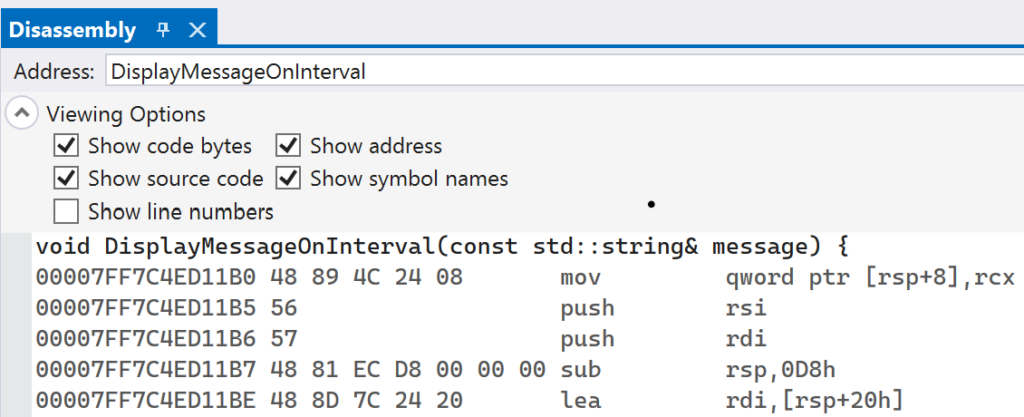
Navigate to the Disassembly window in Visual Studio and paste in the address of trampolineStub in the Address text box. You should see instructions similar to what is shown in below:
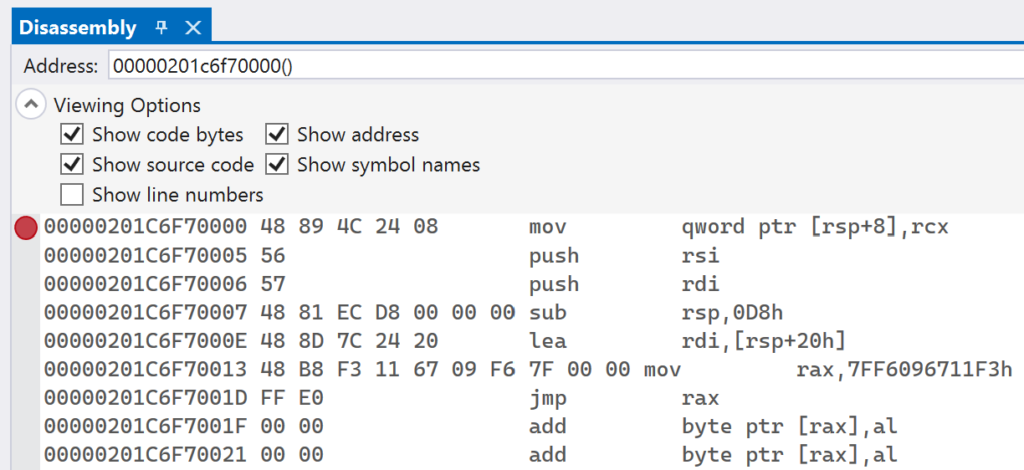
In the Disassembly window, you can set breakpoints on individual instructions. As in the code editor, click to the left of the address to enable a breakpoint on it. Once your breakpoint is enabled, you will see a red circle.
After setting this breakpoint, continue execution of the program. The breakpoint on the while loop should be hit, since it is the line of code that immediately follows the InstallInlineHook function. Continue execution once more. You should now be broken on the mov instruction in the trampoline stub. The call stack shows that the trampoline stub is being called from the HookDisplayMessageOnInterval function, as expected.
In the Disassembly window, with press the F11 key to let the Visual Studio debugger perform a Step Into operation. Continue doing this until you have executed past the final jmp rax instruction of the trampoline stub. Notice that you are back in the original HookDisplayMessage function, but at the address past the overwritten bytes.
This has shown the entire flow of events, starting with the generation of the trampoline stub, then its invocation by the hook function, and finally how the trampoline stub passes control back to the original function.
Detours
Detours is a library released by Microsoft that, among other useful features, provides the ability to install inline hooks on arbitrary functions. The library itself is open source, available for multiple architectures, and well documented. Detours has some nice abstractions; the library hides the need to change memory page protections, performs the trampoline function allocation and copy, and is able to handle fixing up relative instructions that were relocated. Internally, Detours is able to disassemble instructions at the target address, so as a user you do not need to calculate how many instructions to relocate and overwrite.
Installing the hook
To install an inline hook using Detours, the InstallInlineHook function can be modified as is shown below:
template <typename Trampoline>
void InstallInlineHook(void* targetAddress, void* const hookAddress,
    const Trampoline*& trampolineAddress) {

    DetourTransactionBegin();

    DetourUpdateThread(GetCurrentThread());
    PDETOUR_TRAMPOLINE detourTrampolineAddress{};
    DetourAttachEx(&(static_cast<void*&>(targetAddress)),
        static_cast<void *>(hookAddress),
        &detourTrampolineAddress, nullptr, nullptr);
    trampolineAddress = reinterpret_cast<Trampoline*>(detourTrampolineAddress);
    // Add any additional hooks here

    DetourTransactionCommit();
}
The DisplayMessageOnInterval function showing how to install an inline hook with the Detours API.
Detours treats installing inline hooks as part of a transaction, meaning you can perform multiple hook install and removal operations in one action. DetourTransactionBegin is called to begin a new transaction to install or remove an inline hook — a detour to use the library’s terminology. DetourUpdateThread is used to enlist a thread to perform the instruction overwriting. DetourAttach[Ex] is used to specify where the detour should be installed; which target address should be detoured to a hook address. Lastly, DetourTransactionCommit is called to commit the transaction and perform the installation or removal of detours.
Running the demo
The InlineHookDetours project provides the full implementation that was presented in this post. When opening this project, a Windows x64 package of Detours will be installed via the provided vcpkg.json file. Once installed, the project can be built and the demo application can be run. Detours will work in a very similar manner to the previous section where inline hooks with trampolines were covered. The best way to see this is to add breakpoints on the InstallInlineHook function and the subsequent line, as shown below.
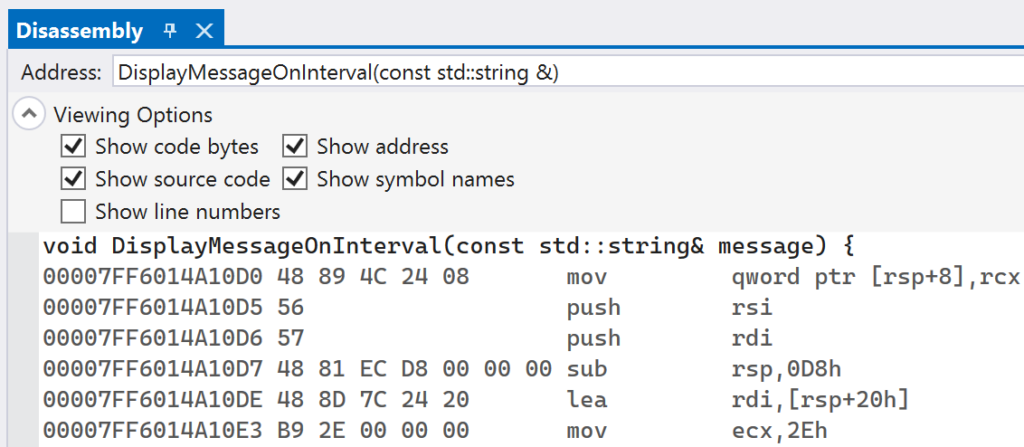
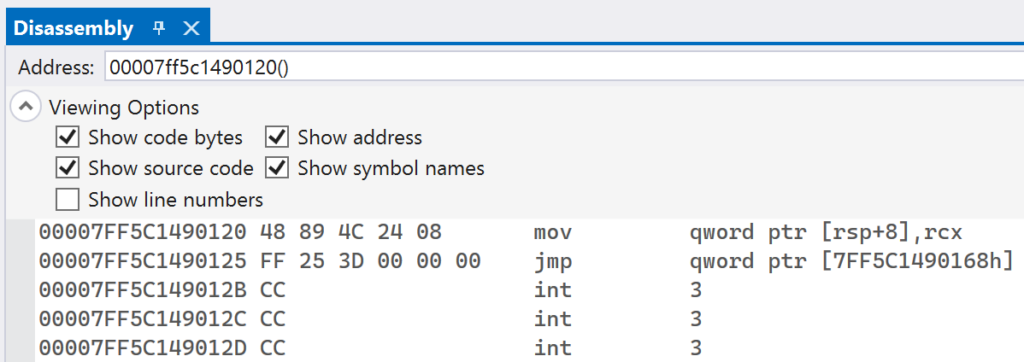
Launch the application and let it hit the first breakpoint on InstallInlineHook. Use the Disassembly window to inspect the instructions at the address of DisplayMessageOnInterval. The instructions should look similar to the image below.
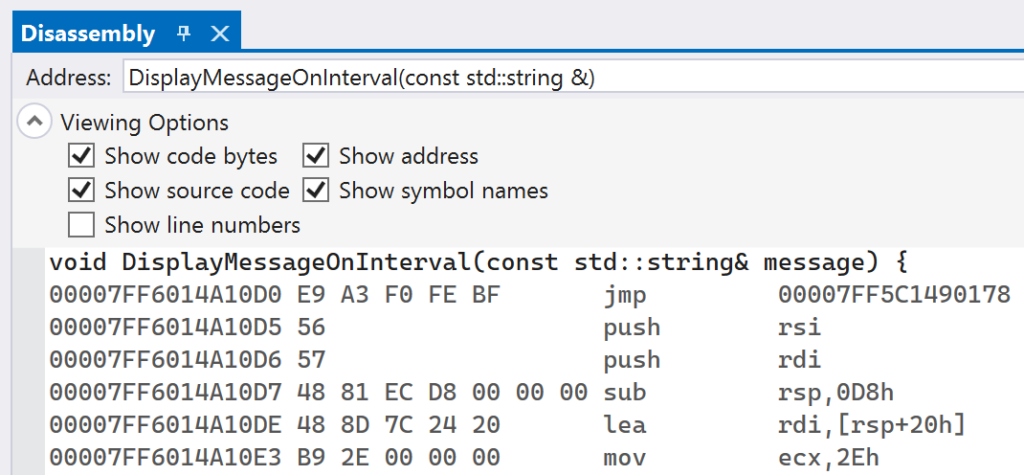
Continue execution to let the Detours library install the inline hook. After the second breakpoint following the InstallInlineHook function is hit, the hook will be installed. You can inspect the address of DisplayMessageOnInterval again and see that there has been an unconditional jump written in.
One interesting thing about the jump is that Detours uses a relative jump, instead of a jump to an absolute address as was demonstrated in the previous section. This is useful because it takes up less bytes: five bytes for the relative jump, while the absolute requires twelve bytes. The only downside is that the destination address must reside within a 2 GB range, either forward of backwards, in memory from the source instruction. In practical terms this limitation is usually not an issue.
You can also inspect the address of HookDisplayMessageOnIntervalTrampoline to see the trampoline that Detours generated. You can find the address by highlighting the variable while in a broken state. A context menu containing the address will pop up.
Putting this address in the Disassembly window will show the instructions at the trampoline. The original instruction that was overwritten by the five byte relative conditional jump was itself five bytes long, the trampoline will only contain one instruction, followed by an unconditional jump back to the original function.


